Web services support in BizTalk has been available
natively since BizTalk 2004, but that version could exploit only the
limited service capabilities included in ASP.NET web services (ASMX).
With the introduction of
BizTalk Server 2006, and now 2009, Windows Communication Foundation is a
first-class citizen in the BizTalk architecture with native support for
WCFbased Send and Receive Adapters.
Leveraging the
WCF adapter as your solution's integration endpoints automatically
provides a highly configurable, standards-compliant, and interoperable
option for other applications to communicate with your service.
WCF and the BizTalk adapter model fit nicely together. Table 1 compares how each of these technologies can work together to provide a seamless communication model.
Table 1. WCF and BizTalk Feature Comparison
| WCF Feature | BizTalk Feature |
|---|
| Multiple transport bindings | Multiple adapters, each having their own transport |
| Configurable setup via application configuration files | Adapter configuration via the BizTalk Administration Console |
| Multiple endpoints for a single application | Multiple receive locations for a single application |
| Multiple security options | Each receive location can have different security configurations and/or pipelines |
1. Exploring the Built-in WCF Adapter Transport Support
BizTalk 2009 has seven WCF
adapters. Each of the adapters, with the exception of the
WCFCustomIsolated adapter, consists of Send and Receive Adapters.
The WCF Receive Adapters
are provided as two types of adapters: isolated WCF adapters and
in-process WCF adapters. Although in-process adapters are managed by
BizTalk Server, isolated adapters are not instantiated by BizTalk
Server. Rather, they are instantiated and hosted in another process. The
isolated WCF adapters are hosted in web applications running in
Internet Information Services (IIS).
You can find these adapters as part of the configuration of a receive location or send port. Figure 1 shows the list of WCF Receive Adapters.
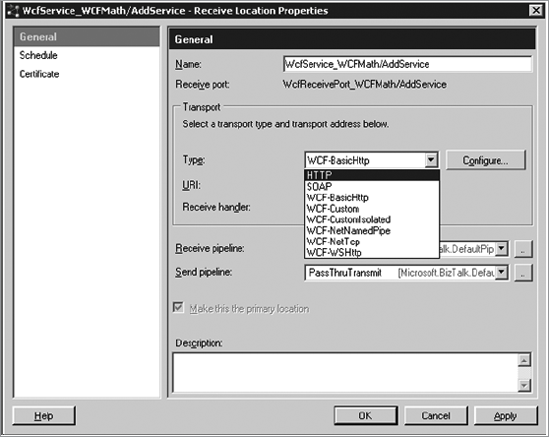
Table 2
describes each of the adapters natively supported by BizTalk and
explains when each is best used or should be considered to meet your
requirements.
Table 2. BizTalk Receive Adapters
| Adapter | WCF Binding Name | Description |
|---|
| WCF-BasicHttp | basicHttpBinding | The
WCF-BasicHttp adapter is commonly used as a default transport. It
provides maximum backward compatibility with first-generation web
services and leverages the HTTP and HTTPS protocols for enhanced
security configuration. Since this binding relies on HTTP, it is limited
to the features it supports. On the other hand, it is also one of the
faster bindings that WCF supports. Consider using this binding if you
need to communicate with ASMX web services, need support for
communication through a firewall, or just want the fastest possible HTTP
communication. |
| WCF-WSHttp | wsHttpBinding | The
WCF-WSHttp adapter provides compatibility with the WS-* specifications
including WS-Security, WS-AtomicTransactions, and WS-Addressing. Using
this adapter provides enhanced security features, including the ability
to apply security at the message level instead of the transport level.
This allows the messages to be passed along multiple endpoints and
transports without losing the security context of the original request.
Using wsHttpBinding also provides maximum compatibility with other
vendors. The WS-* specifications were jointly developed by Microsoft,
IBM, Sun, BEA, and other major platform vendors. |
| WCF-NetNamedPipe | netNamedPipeBinding | Named
Pipes is a fast, binary communication used for on-machine
communication. The WCF-NetNamedPipe Receive Adapter is useful when
you're preprocessing service requests before processing within BizTalk.
For example, you may want to build your web service to prevalidate the
message values to meet certain business rules with BRE prior to
submitting the request to your orchestration. |
| WCF-NetTcp | netTcpBinding | The
netTcpBinding is a fast communication protocol using binary encoding.
It's targeted toward intranet communication and is intended for
WCF-to-WCF use only. In its default configuration, netTcpBinding is
faster than wsHttpBinding because its security behavior is an opt-in
model, rather than opt-out. |
| WCF-Custom | <various> | The
WCF-Custom and WCF-CustomIsolated adapters are used to fully control
how you want your endpoint to behave. With the other adapters, BizTalk
provides a user interface to customize the common properties of the
corresponding binding. With the WCF-Custom and WCF-CustomIsolated
adapters, all WCF properties are customizable. This makes configuration
more flexible but also assumes an increased level of knowledge of how
the WCF platform works. |
| WCF-NetMsmq | netMsmqBinding | Microsoft
Message Queuing (MSMQ) is a hidden gem in the Windows platform that is
underused in today's enterprise environments. There are many uses for
MSMQ, which fits very nicely with BizTalk. With many BizTalk services
being asynchronous, MSMQ is a natural fit for guaranteed, transactional
delivery across computers. Consider using the WCF-NetMsmq adapter if you
need a fire-and-forget model of communication. |
|
MSMQ can even be leveraged
over the Internet. MSMQ supports submission of messages via HTTP and
supports routing and proxies for communications through a DMZ.
|
|
2. Using the WCF Service Publishing Wizard
After you've developed your orchestration, you must complete a series of steps before consumers can call your service:
Choose whether to publish orchestrations or schemas as a WCF service.
Specify the assembly containing your orchestrations and schemas.
Specify service names and schema types.
Specify a service namespace.
Performing all these steps
would be time-consuming and error-prone manually. Instead, the BizTalk
WCF Service Publishing Wizard will automate this entire process. This
program, which you start by clicking its icon in your Start menu, steps
you through a series of screens to gather all the information needed to
generate your WCF service. Then the wizard generates the service as you
have specified it.
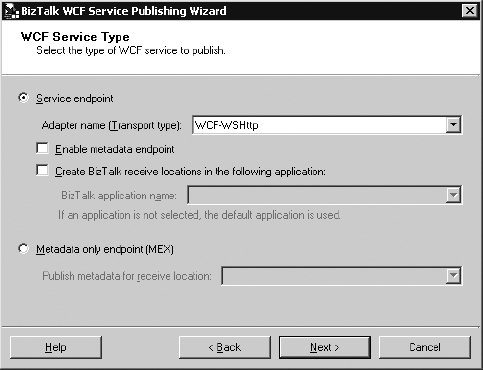
2.1. Step 1: Select a WCF transport
Figure 2
shows the first screen in the BizTalk WCF Service Publishing Wizard.
This screen allows you to either create a new service endpoint or
publish a MEX endpoint only. A metadata exchange endpoint provides
consuming applications with the information needed to know how to call
your service. When creating a new service endpoint, you must do the
following:
Select a transport type of either WCF-WSBasicHttp, WCF-WSHttp, or WCF-CustomIsolated.
Optionally enable a MEX endpoint that describes your service.
Optionally create the required receive location and receive port in the selected BizTalk application.
2.2. Step 2: Choose Whether to publish an Orchestration or a Schema
Once you've selected
your transport type and optional choices, click Next to display the
Create WCF Service page. On the Create WCF Service screen, you can
choose from one of the following options:
Publish BizTalk Orchestrations As a WCF Service: This will create your service based upon selected orchestrations and ports in a BizTalk assembly.
Publish Schemas As WCF Service:
This will publish WCF services by specifying operations and messages of
WCF services using selected schemas from BizTalk assemblies as request
or response message parts.
2.3. Step 3: Select Your Assembly
Once you've chosen
your option, click Next to display the BizTalk Assembly page. This
simple page provides a location for you to browse to and select your
BizTalk assembly containing the orchestrations or schemas you want to
publish. The wizard will use .NET reflection to load the types in this
assembly.
2.4. Step 4: Customize Your WCF Service
At this point, the wizard has all it needs to generate a WCF endpoint except names for your service and your web methods. Figure 3 shows the default names given to a new service, which you can then customize.

You will want to modify the
default web service description to provide a more meaningful set of
names to your consumers. To do this, simply right-click each root,
service, operation, and method node within the tree and select the
corresponding Rename option.
Additionally, for the Request
and Response nodes, right-click, and choose the Select Schema Type
option. Selecting this option displays a dialog box to browse to the
assembly that contains the schemas to send or receive. Choose the
appropriate schemas for your application.
Once you've customized each of the nodes, click Next to display the WCF Service Properties page.
2.5. Step 5: Set Your Service Namespace
This step is to provide a
namespace for your service. On the WCF Service Properties page, simply
provide your service a namespace, and click Next.
2.6. Step 6: Specify Your WCF Endpoint URI
Lastly, you need to provide the wizard where you would like it to create your endpoint. Figure 4 shows the options available when creating your endpoint location.
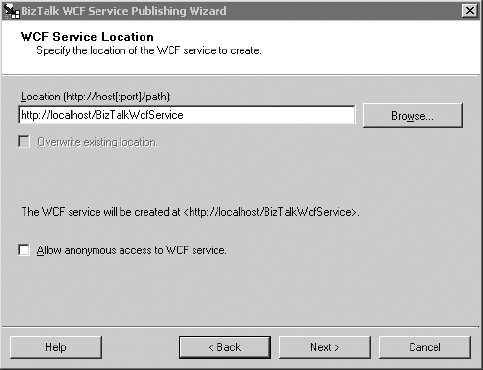
Once you've selected your
URL and optionally allowed anonymous access, the wizard will create your
endpoint in IIS where it will be accessible to consuming applications.
