Logo
HOW TO
Windows XP
Windows Vista
Windows 7
Windows Azure
Windows Server
Windows Phone
 
 
Windows 7

Microsoft OneNote 2010 : Doing Research with Linked Notes (part 1) - Beginning a Linked Notes Session

6/19/2014 9:02:20 PM
Linked notes are a convenient new feature in OneNote 2010 that allows you to dock the OneNote 2010 program window to the side of your desktop so that you can take notes on anything that you’re reading and researching in other programs or in your Web browser. When you take notes in this side-by-side fashion, they are automatically linked to their source material in the programs in which they originated (see Figure 1).
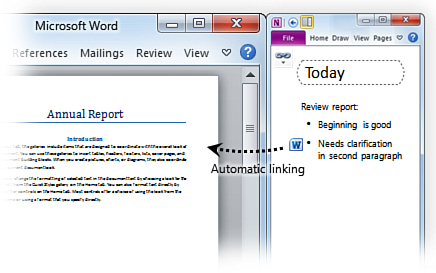
Figure 1. In linked note-taking mode, you can take notes side by side with Internet Explorer web pages, Word documents, PowerPoint presentations, or other OneNote pages. Each paragraph of your linked notes remembers the program and file you were looking at when you took the notes in question, allowing you to easily revisit source and research material.


Whenever you’re in a linked notes session and you take notes on things you’re looking at in Internet Explorer, in Word, or in PowerPoint, each paragraph in those notes will display a link icon when you hover your mouse pointer over any paragraph of the notes text. You can click these link icons to quickly return to the source material and the associated program that the notes relate to.

Linked notes in OneNote are a revolutionary way for your computerized notes to retain the full context of your thought process by capturing and saving the relationship between your thoughts and ideas that originated at the time when you looked at the source materials that sparked those thoughts and ideas.

In addition to the automatic, clickable link icons that appear next to linked notes text, OneNote also indicates the program that the source material is linked with (for example, Internet Explorer), and it stores a small thumbnail image and a text excerpt of the page, so you can easily recognize the correct web page, document, or presentation slide again later on.


Because the linked notes feature is new to OneNote 2010, it can be used only while working in a notebook that’s been created or saved in the OneNote 2010 format. If you’re working in older, shared OneNote 2007 notebooks that have not yet been upgraded, you won’t be able to use the linked notes feature.

Beginning a Linked Notes Session

The linked notes feature in OneNote is available when viewing a web page in Internet Explorer 8 or later, a Word 2010 document, a PowerPoint 2010 presentation, or any OneNote 2010 notes pages.

To start a linked notes session, do the following:

1.
If you want to take linked notes on web pages that you’ll be viewing in Internet Explorer, click the Tools button on the Internet Explorer toolbar, and then click OneNote Linked Notes (see Figure 2).
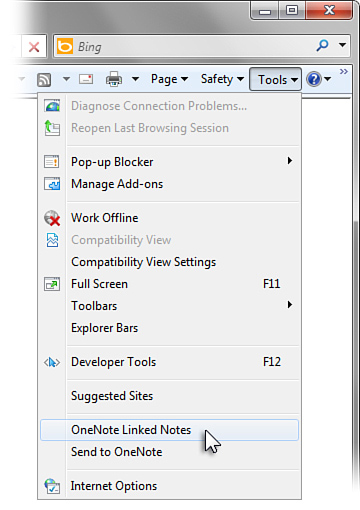
Figure 2. To start a linked note-taking session with Internet Explorer, click the Tools button near the upper-right corner of the browser window and then click the OneNote Linked Notes command on the menu that appears.


2.
If you want to take linked notes on files you’ll be viewing in Word 2010, PowerPoint 2010, or OneNote 2010, go to the ribbon in the program you want, click the Review tab, and then, in the Notes group, click Linked Notes (see Figure 3).
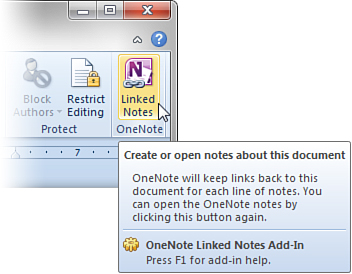


Figure 3. To start a linked note-taking session in Word 2010, PowerPoint 2010, or OneNote 2010, click the Review tab on the ribbon and then click the Linked Notes button. Shown here is the entry point for Word 2010.


3.
In the Select Location in OneNote dialog box that appears, select the notebook section or page where you want to create your linked notes, and then click OK. If you select a section, a new page will be created in it. If you select an existing page, your linked notes will be added to that page.

4.
OneNote opens a docked window on the right side of your screen and opens the page you selected on which to take your linked notes. If you selected a new page, type a descriptive title into the Page Title field at the top of the page, above the date and time stamp for the page, and then press Enter to move the cursor to a new notes container.

5.
In the upper-left corner of the docked OneNote window, look for the chain-link icon. When you move the mouse pointer over it, a ToolTip will confirm that you’re currently working in a linked notes session (see Figure 4).
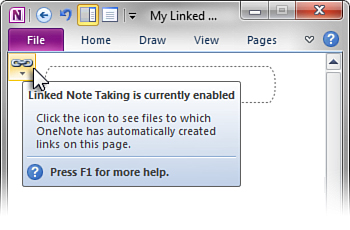
Figure 4. The small chain-link icon in the upper-left corner of the docked OneNote window indicates whether you’re in a linked note-taking session or not. Move the mouse pointer over the icon to see a status ToolTip or click the link icon for more options.


6.
Now, take notes the way you normally would. For example, switch to Internet Explorer and bring up a web page. When you return to the docked OneNote window and start typing notes, each paragraph of notes that you create while Internet Explorer is active in docked mode will be linked to the current web page that it displays. If you switch to another page and take more notes, those paragraphs will then be linked to the new page, and so on. Similarly, if you bring up any Word documents or PowerPoint presentations during your linked notes session, they will also be linked to any notes you take in the docked OneNote window.

Regarding the choice you have in step 3, I recommend that you create each linked notes session on a fresh page in one of your notebook sections, at least until you become a bit more familiar with linked note-taking. After you’ve had a chance to really try out this feature with your real notes and it makes sense to you, you can mix and match future linked notes with your existing notes.


Other -----------------
- Microsoft OneNote 2010 : Doing Research with Side Notes (part 3) - Moving Side Notes to Your Existing Notes
- Microsoft OneNote 2010 : Doing Research with Side Notes (part 2) - Reviewing Side Notes
- Microsoft OneNote 2010 : Doing Research with Side Notes (part 1) - Creating Side Notes
- Games and Windows 7 : Installing and Playing Third-Party Games
- Games and Windows 7 : Using the Games Explorer (part 4) - Managing Your Game Controllers and Other Game-Related Hardware
- Games and Windows 7 : Using the Games Explorer (part 3) - Rating Your System's Performance
- Games and Windows 7 : Using the Games Explorer (part 2) - Customizing Games Explorer
- Games and Windows 7 : Using the Games Explorer (part 1)
- Microsoft Excel 2010 : Protecting and Securing a Workbook - Avoiding Harmful Attacks, Using the Trust Center
- Microsoft Excel 2010 : Protecting and Securing a Workbook - Adding a Signature Line
 
 
REVIEW
- First look: Apple Watch

- 10 Amazing Tools You Should Be Using with Dropbox

- 3 Tips for Maintaining Your Cell Phone Battery (part 1)

- 3 Tips for Maintaining Your Cell Phone Battery (part 2)
 
VIDEO TUTORIAL
- How to create your first Swimlane Diagram or Cross-Functional Flowchart Diagram by using Microsoft Visio 2010 (Part 1)

- How to create your first Swimlane Diagram or Cross-Functional Flowchart Diagram by using Microsoft Visio 2010 (Part 2)

- How to create your first Swimlane Diagram or Cross-Functional Flowchart Diagram by using Microsoft Visio 2010 (Part 3)
 
Popular tags
Microsoft Access Microsoft Excel Microsoft OneNote Microsoft PowerPoint Microsoft Project Microsoft Visio Microsoft Word Active Directory Biztalk Exchange Server Microsoft LynC Server Microsoft Dynamic Sharepoint Sql Server Windows Server 2008 Windows Server 2012 Windows 7 Windows 8 Adobe Indesign Adobe Flash Professional Dreamweaver Adobe Illustrator Adobe After Effects Adobe Photoshop Adobe Fireworks Adobe Flash Catalyst Corel Painter X CorelDRAW X5 CorelDraw 10 QuarkXPress 8 windows Phone 7 windows Phone 8 BlackBerry Android Ipad Iphone iOS
Popular keywords
HOW TO Swimlane in Visio Visio sort key Pen and Touch Creating groups in Windows Server Raid in Windows Server Exchange 2010 maintenance Exchange server mail enabled groups Debugging Tools Collaborating
Top 10
- Microsoft Excel : How to Use the VLookUp Function
- Fix and Tweak Graphics and Video (part 3) : How to Fix : My Screen Is Sluggish - Adjust Hardware Acceleration
- Fix and Tweak Graphics and Video (part 2) : How to Fix : Text on My Screen Is Too Small
- Fix and Tweak Graphics and Video (part 1) : How to Fix : Adjust the Resolution
- Windows Phone 8 Apps : Camera (part 4) - Adjusting Video Settings, Using the Video Light
- Windows Phone 8 Apps : Camera (part 3) - Using the Front Camera, Activating Video Mode
- Windows Phone 8 Apps : Camera (part 2) - Controlling the Camera’s Flash, Changing the Camera’s Behavior with Lenses
- Windows Phone 8 Apps : Camera (part 1) - Adjusting Photo Settings
- MDT's Client Wizard : Package Properties
- MDT's Client Wizard : Driver Properties
 
Windows XP
Windows Vista
Windows 7
Windows Azure
Windows Server
Windows Phone
2015 Camaro