Logo
Windows XP
Windows Vista
Windows 7
Windows Azure
Windows Server
Windows Phone
EPL Standings
 
 
Windows 7

Games and Windows 7 : Using the Games Explorer (part 1)

6/14/2014 9:12:08 PM

Windows 7, like Windows Vista before it, includes a new Games Explorer that is prominently linked to from the right-most side of the main Start menu display, as shown in Figure 1.

Figure 1. Apparently, games are as important in Windows 7 as the computer and the network. Yeah, you bet they are.

NOTE

Don't see it? If the Games link does not appear in your Start menu, you can easily add it back: right-click the Start button and choose Properties. Then, in the Start Menu tab, click Customize to display the Customize Start Menu window. In this window, scroll down to the Games link (the items are alphabetical) and choose from Display as a link (the default), Display as a menu, or Don't display this item.

The first time you run Games Explorer, you'll be presented with a dialog, Set up Games, that asks whether you'd like to use recommended settings or customized update and folder settings. If you choose Recommended settings, Windows 7 will automatically check online for game updates, and the Games Explorer will automatically download game art and information, and collect information about the games you most recently played. We suggest simply using the recommended settings in this case.


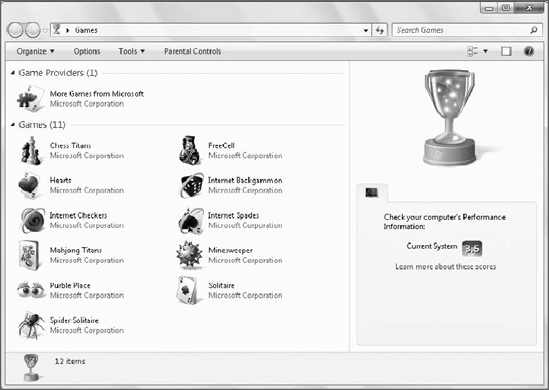
When you select this option, you're shown the Games Explorer, as referenced in Figure 2 and oftentimes referred to simply as Games. Games is a handy front end to the games that are included with Windows Vista, as well as a number of other game-related features, including third-party games you install yourself, game hardware, parental controls, and other tools.

Figure 2. The Games Explorer

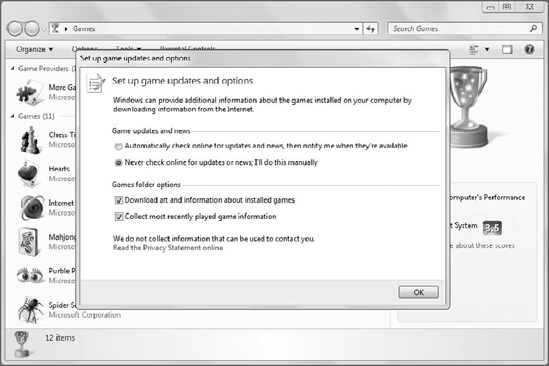
Actually, if this is the first time you've opened the Games Explorer, you'll see a slightly different display: Microsoft provides a window with which you can configure various options related to the Games Explorer and the built-in Windows 7 games, as shown in Figure 3.

The first choice you need to make is whether to let Games Explorer automatically update itself with game updates and—new to Windows 7—news about game-related products and services. You can also decide whether you want the Games Explorer to automatically download art and information about installed games—similar to the way Windows Media Player downloads album art—and collect information about the games you play. This latter feature isn't as Big Brother as it sounds. Instead, Windows 7 is simply creating a Most Recently Used (MRU) list so that it can display those games you've played recently and most frequently at the front of your list of games, if you so choose.

Figure 3. The first time you run Games Explorer, you can configure a few options.

If you clicked through this window without paying attention, or think you may want to pick different options, fear not. You can make these configuration changes later. Just click the Options toolbar menu item in Games Explorer to redisplay the window.


Once you dispense with this window, you're free to, ahem, explore the Games Explorer. It works largely like the version from Windows Vista: as you select any of the built-in game titles, a large version of the game's icon and its Entertainment Software Rating Board (ESRB) rating is displayed in the Preview Pane, which is found on the right side of the Games window.

This display has changed a little bit since Vista, however: thanks to a new tab-based user interface, you can toggle between the ESRB rating and a new Performance tab, shown in Figure 4, that provides the recommended and required Windows Experience Index (WEI) score for playing the game, as well as the WEI score for your PC so you can compare and contrast.

Depending on how you've installed or acquired Windows 7, you may see additional games in the Games Explorer. For example, PC makers often include their own selection of game titles.


Figure 4. Performance information is now available from within a new tab-based user interface in Games Explorer.

As a program explorer and shell location, the Games Explorer is customizable in certain ways. Via a standard Organize toolbar menu button, you can perform common shell tasks and change the layout of the window. The toolbar also includes links to Games Explorer options, game-related tools, and Windows 7's parental controls, the latter of which provide a way for parents to restrict which games their kids can play.

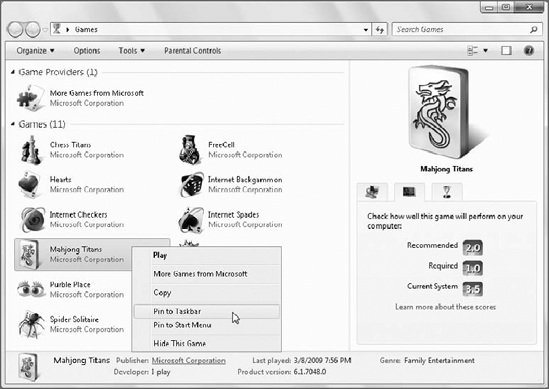
You can also right-click a game icon and choose the Play option if you think double-clicking is too simple and obvious. Glibness aside, there is a great new reason to right-click games in the Games Explorer: with Windows 7, two new Pin To options enable you to attach shortcuts to the Start menu or, more usefully, to the taskbar. So if you find yourself playing a certain game quite frequently, you can skip the rigmarole of navigating through the Start menu or using the Games Explorer and simply make that game a permanent inhabitant of your taskbar, as shown in Figure 5.

Figure 5. If you're a big fan of a particular game, you can pin it to your taskbar for even quicker access.


NOTE

Here's a useless but fun fact: Microsoft did not create any of the games in Windows 7. Instead, they were created by third parties for the software giant. For example, Oberon Games was responsible for updating games such as Minesweeper and Solitaire.

Other -----------------
- Microsoft Excel 2010 : Protecting and Securing a Workbook - Avoiding Harmful Attacks, Using the Trust Center
- Microsoft Excel 2010 : Protecting and Securing a Workbook - Adding a Signature Line
- Microsoft Excel 2010 : Protecting and Securing a Workbook - Adding a Digital Signature
- Microsoft OneNore 2010 : Housecleaning in OneNote - Opening a Backup Copy of a Notebook Section
- Microsoft OneNore 2010 : Housecleaning in OneNote - Backing Up Notebooks Manually, Choosing How to Back Up Notebooks
- Microsoft Excel 2010 : Protecting and Securing a Workbook - Adding Password Protection to a Workbook
- Microsoft Excel 2010 : Protecting and Securing a Workbook - Adding Security Encryption to a Workbook
- Microsoft Excel 2010 : Protecting and Securing a Workbook - Locking or Unlocking Worksheet Cells
- Microsoft Excel 2010 : Protecting and Securing a Workbook - Protecting a Worksheet - Apply a Password to a Worksheet
- Microsoft Excel 2010 : Protecting and Securing a Workbook - Inspecting Workbooks
- Working in the Background : WORKING WITH THE NETWORK LIST MANAGER
- Working in the Background : IMPLEMENTING APPLICATION RESTART AND RECOVERY
- Working in the Background : PROVIDING POWER MANAGEMENT (part 2) - Detecting a Change in Monitor State
- Working in the Background : PROVIDING POWER MANAGEMENT (part 1) - Getting the Power Management State
- Automating Windows 7 Installation : Customizing Images Using Deployment Image Servicing and Management (part 3) - Servicing the Operating System in an Image , Committing an Image
- Automating Windows 7 Installation : Customizing Images Using Deployment Image Servicing and Management (part 2) - Mounting an Image , Servicing Drivers in an Image
- Automating Windows 7 Installation : Customizing Images Using Deployment Image Servicing and Management (part 1) - Viewing Information about an Image with DISM
- Automating Windows 7 Installation : Applying an Image Using ImageX
- Automating Windows 7 Installation : Capturing an Image Using ImageX
- Microsoft Visio 2010 : Creating Web Pages from Visio Drawings (part 4) - Fine-tuning Web Pages and Battling Bugs - Saving a Visio Drawing as a Web Page
 
 
Most view of day
- Backup and Restore of Microsoft Lync Server 2010 : Restore Processes
- Participating in Internet Newsgroups : Downloading Messages
- Managing Windows Licensing and Activation : Notification Experience and Reduced Functionality Mode
- Adobe Dreamweaver CS5 : Working with Multimedia and Online Tools - Using Plug-ins
- Windows Phone 8 : Using Sound (part 1) - Playing Sounds with MediaElement, Using XNA Libraries, Playing Sounds with XNA, Adjusting Playback
- BizTalk 2006 : Getting Started with Pipeline Development (part 3) - Configuring Recoverable Interchanges, Using the Default Pipelines
- Microsoft Outlook 2010 : Working with Tasks - Adding a Task
- Microsoft Visio 2010 : Creating and Using Shape Data Fields (part 1) - Adding Simple Data Fields
- Microsoft OneNore 2010 : Opening a Backup Copy of a Notebook Section
- Windows Phone 8 : Developing for the Phone - The Phone Experience (part 3) - Application Client Area, Application Bar
Top 10
- Windows Server 2012 : DHCP,IPv6 and IPAM - Exploring DHCP (part 3) - Creating IPv4 DHCP Scopes
- Windows Server 2012 : DHCP,IPv6 and IPAM - Exploring DHCP (part 2) - Installing DHCP Server and Server Tools
- Windows Server 2012 : DHCP,IPv6 and IPAM - Exploring DHCP (part 1)
- Windows Server 2012 : DHCP,IPv6 and IPAM - Understanding the Components of an Enterprise Network
- Microsoft OneNote 2010 : Using the Research and Translate Tools (part 3) - Translating Text with the Mini Translator
- Microsoft OneNote 2010 : Using the Research and Translate Tools (part 2) - Translating a Word or Phrase with the Research Pane
- Microsoft OneNote 2010 : Using the Research and Translate Tools (part 1) - Setting Options for the Research Task Pane, Searching with the Research Task Pane
- Microsoft OneNote 2010 : Doing Research with Linked Notes (part 2) - Ending a Linked Notes Session, Viewing Linked Notes
- Microsoft OneNote 2010 : Doing Research with Linked Notes (part 1) - Beginning a Linked Notes Session
- Microsoft OneNote 2010 : Doing Research with Side Notes (part 3) - Moving Side Notes to Your Existing Notes
 
 
Windows XP
Windows Vista
Windows 7
Windows Azure
Windows Server
Windows Phone
2015 Camaro