Logo
HOW TO
Windows XP
Windows Vista
Windows 7
Windows Azure
Windows Server
Windows Phone
 
 
Windows 7

Microsoft Excel 2010 : Protecting and Securing a Workbook - Inspecting Workbooks

5/27/2014 12:57:20 AM
While you work on your workbook, Excel automatically saves and manages personal information and hidden data to enable you to create and develop a workbook with other people. The personal information and hidden data includes comments, revision marks, versions, ink annotations, document properties, invisible content, header and footer information, rows and columns, worksheets, document server properties, and custom XML data. The Document Inspector uses inspector modules to find and remove any hidden data and personal information specific to each of these modules that you might not want to share with others. If you remove hidden content from your workbook, you might not be able to restore it by using the Undo command, so it’s important to make a copy of your workbook before you remove any information.

Inspect a Workbook

1. Click the File tab, click Save As, type a name to save a copy of the original, specify a folder location, and then click Save.

2. Click the File tab, and then click Info.

3. Click the Check for Issues button, and then click Inspect Document.

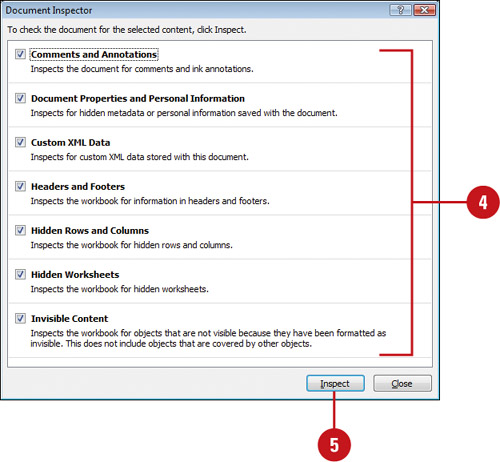
4. Select the check boxes with the content you want to find and remove:

  • Comments and Annotations. Includes comments and ink annotations.

  • Document Properties and Personal Information. Includes metadata document properties (Summary, Statistics, and Custom tabs), the file path for publishing Web pages, document server properties, and content type information.

    Did You Know?

    What is metadata? Metadata is data that describes other data. For example, text in a workbook is data, while the number of worksheets is metadata.

  • Custom XML Data. Includes any custom XML data.

  • Headers and Footers. Includes information in headers and footers.

  • Hidden Rows and Columns. Includes information in hidden rows and columns.

  • Hidden Worksheets. Includes information in hidden worksheets.

  • Invisible Content. Includes objects formatted as invisible. Doesn’t include objects covered by other objects.

5. Click Inspect.

6. Review the results of the inspection.

7. Click Remove All for each inspector module in which you want to remove hidden data and personal information.

Trouble?

Before you click Remove All, be sure you want to remove the information. You might not be able to restore it.

8. Click Close.

Other -----------------
- Working in the Background : WORKING WITH THE NETWORK LIST MANAGER
- Working in the Background : IMPLEMENTING APPLICATION RESTART AND RECOVERY
- Working in the Background : PROVIDING POWER MANAGEMENT (part 2) - Detecting a Change in Monitor State
- Working in the Background : PROVIDING POWER MANAGEMENT (part 1) - Getting the Power Management State
- Automating Windows 7 Installation : Customizing Images Using Deployment Image Servicing and Management (part 3) - Servicing the Operating System in an Image , Committing an Image
- Automating Windows 7 Installation : Customizing Images Using Deployment Image Servicing and Management (part 2) - Mounting an Image , Servicing Drivers in an Image
- Automating Windows 7 Installation : Customizing Images Using Deployment Image Servicing and Management (part 1) - Viewing Information about an Image with DISM
- Automating Windows 7 Installation : Applying an Image Using ImageX
- Automating Windows 7 Installation : Capturing an Image Using ImageX
- Microsoft Visio 2010 : Creating Web Pages from Visio Drawings (part 4) - Fine-tuning Web Pages and Battling Bugs - Saving a Visio Drawing as a Web Page
 
 
REVIEW
- First look: Apple Watch

- 10 Amazing Tools You Should Be Using with Dropbox

- 3 Tips for Maintaining Your Cell Phone Battery (part 1)

- 3 Tips for Maintaining Your Cell Phone Battery (part 2)
 
VIDEO TUTORIAL
- How to create your first Swimlane Diagram or Cross-Functional Flowchart Diagram by using Microsoft Visio 2010 (Part 1)

- How to create your first Swimlane Diagram or Cross-Functional Flowchart Diagram by using Microsoft Visio 2010 (Part 2)

- How to create your first Swimlane Diagram or Cross-Functional Flowchart Diagram by using Microsoft Visio 2010 (Part 3)
 
Popular tags
Microsoft Access Microsoft Excel Microsoft OneNote Microsoft PowerPoint Microsoft Project Microsoft Visio Microsoft Word Active Directory Biztalk Exchange Server Microsoft LynC Server Microsoft Dynamic Sharepoint Sql Server Windows Server 2008 Windows Server 2012 Windows 7 Windows 8 Adobe Indesign Adobe Flash Professional Dreamweaver Adobe Illustrator Adobe After Effects Adobe Photoshop Adobe Fireworks Adobe Flash Catalyst Corel Painter X CorelDRAW X5 CorelDraw 10 QuarkXPress 8 windows Phone 7 windows Phone 8 BlackBerry Android Ipad Iphone iOS
Popular keywords
HOW TO Swimlane in Visio Visio sort key Pen and Touch Creating groups in Windows Server Raid in Windows Server Exchange 2010 maintenance Exchange server mail enabled groups Debugging Tools Collaborating
Top 10
- Microsoft Excel : How to Use the VLookUp Function
- Fix and Tweak Graphics and Video (part 3) : How to Fix : My Screen Is Sluggish - Adjust Hardware Acceleration
- Fix and Tweak Graphics and Video (part 2) : How to Fix : Text on My Screen Is Too Small
- Fix and Tweak Graphics and Video (part 1) : How to Fix : Adjust the Resolution
- Windows Phone 8 Apps : Camera (part 4) - Adjusting Video Settings, Using the Video Light
- Windows Phone 8 Apps : Camera (part 3) - Using the Front Camera, Activating Video Mode
- Windows Phone 8 Apps : Camera (part 2) - Controlling the Camera’s Flash, Changing the Camera’s Behavior with Lenses
- Windows Phone 8 Apps : Camera (part 1) - Adjusting Photo Settings
- MDT's Client Wizard : Package Properties
- MDT's Client Wizard : Driver Properties
 
Windows XP
Windows Vista
Windows 7
Windows Azure
Windows Server
Windows Phone
2015 Camaro