You can add Shape Data fields to any Visio
shape. The fields can hold several different types of data, and you can
save sets that you’ve defined and apply them to other shapes all at
once.
1. Adding Simple Data Fields
Adding basic Shape Data fields is a snap using the Define Shape Data dialog. Let’s jump in and give it a whirl!
Adding Shape Data Fields to a Shape
1. | Start a new, blank drawing.
|
2. | Rename Page-1 to Light Bulbs and then save it somewhere convenient as Ch7 Shape Data.vsd.
|
3. | Draw a circle on the page and add a bit of line and fill formatting so that it isn’t too boring. I’ll call this a light bulb shape. I know it’s not much of a light bulb, but it will do for learning purposes.
|
4. | Right-click
the light bulb and choose Data, Define Shape Data. Alternatively, if
the Shape Data window is visible, select a shape, right-click the Shape
Data window, and then choose Define Shape Data. The Define Shape Data
window appears.
|
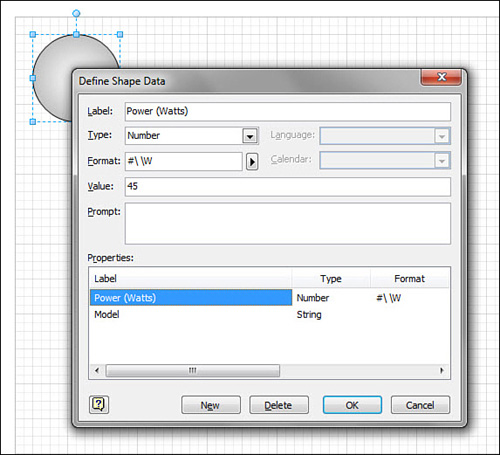
5. | Create a field to hold the bulb’s power rating.
- a. In the Label field, type Power (Watts).
- b. Change the Type to Number.
- c. You can choose a number format by clicking the arrow to the right of the Format field.
Light bulbs are rated in whole-number wattages, so you don’t need
decimal places. Some options for units are provided, but Visio
understands only linear or angular units; there’s no choice for power
units in the list.
You can specify custom prefixes and suffixes in the Format field, however. For the Power field, enter #\ \W
in the Format box. The pound symbol tells Visio to repeat the full
nondecimal part of the number, and the backslashes tell Visio to append
the next character. So you are appending a space and a W to denote Watts.
- d. Set the default by typing 100 in the Value field.
|
6. | Now add a Model field.
- a. Click New at the bottom of the dialog. You see Power in the list of fields, plus a new “Property2”, which is highlighted.
- b. In the Label field, type Model.
- c. Leave the Type as String.
- d. Make a placeholder for the default value by typing <model>. Figure 1 shows how the dialog should appear.

|
7. | Click OK. With the bulb selected, note that the Shape Data window displays the two fields you just created.
|
8. | Make
a few copies of the light bulb and experiment with changing the Shape
Data values. Notice what happens if you try to enter non-numerical text
in the Power field.
|
9. | Save the drawing and keep it open for the next Let Me Try It. |