A Redundant Array of Independent Disks (RAID) is a
special type of volume providing you with redundancy on your drives or
volumes. RAID is designed to provide you with protection from failures
of the drives on your sever. RAID does not replace the need to perform
regular backups of your systems; it offers an additional level of
protection to your system and is designed to work in conjunction with
regular backups. In most cases, RAID will tolerate a loss of one hard
drive, meaning you will not lose any data; however, the performance of
the RAID volume is reduced until you replace the failed drive. RAID is
designed to not only help protect your data but also to help improve the
performance of the overall drive system. RAID can be implemented either
via hardware or software. You will now see how Windows Server 2008 R2
implements RAID at the software level.
1. Understand RAID Levels
Essentially, RAID volumes (commonly called arrays)
create duplicates of the data and spread the data over the drives in
the volume. In the case of a RAID mirror, the data is completely
duplicated in a one-to-one fashion across two drives. However, in other
versions of RAID, a concept called a parity bit
is introduced. One of the keys to understanding how RAID works is
knowing how the parity bit works. The parity bit is the copy of the
data; however, the parity is spread evenly across the drives.
When you begin to work with
RAID, it is important to know what the implications are for the chosen
level of RAID for your server. Windows Server 2008 R2 supports only RAID
0, RAID 1, and RAID 5 at the software level. Several of the more common
RAID levels are listed in Table 1.
Table 1. RAID Levels| RAID Level | Description |
|---|
| RAID 0 | RAID 0 is commonly known as striping.
This is the only level of RAID that does not provide you any protection
from a failed volume. That means if you lose one drive, you will lose
all of the data across your volumes. Striping is designed to provide
improved drive performance. | | RAID 1 | RAID 1 is commonly known as mirroring.
RAID 1 uses only two drives, and as you write to one drive, a duplicate
copy is written to the second drive at the same time. If you lose one
drive in the mirror, the second drive contains the backup, and you will
not lose any data unless you lose the second drive. This is also the
slowest version of RAID. | | RAID 5 | RAID 5, commonly known as striping with parity,
is a combination of performance and redundancy. RAID 5 requires three
(or more) drives or volumes and provides protection if one of the drives
fails. RAID 5 spreads the data and the parity (copy of the data) evenly
across all three drives. If a RAID 5 volume loses a drive, the overall
performance of the drive will be reduced until you replace the drive.
Additionally, RAID 5 may cause a performance impact for your memory and
I/O. This will occur with all writes, since the parity bit must be
calculated and then written. | | RAID 6 | RAID 6 is commonly known as striping with dual parity.
It is nearly identical to RAID 5, but it creates an additional copy of
the parity information. This provides you with the additional ability to
lose up to two drives without losing your data. | | RAID 10 | RAID
10, sometimes referred to as RAID 1+0, is a combination of striping and
mirroring. RAID 10 is essentially a striped mirror, which offers a nice
hardware-level version of RAID with performance and mirroring. |
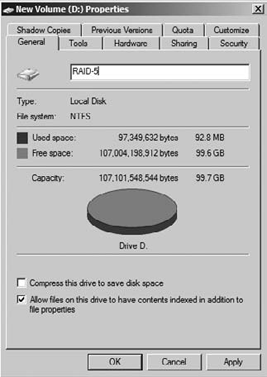
Say, for example, you create a
RAID 5 volume with three hard drives of 100GB each. Your total available
hard drive space for the volume would be 200GB. The reduced space is
because of the parity bit, which is the copy of the data. When your data
is written to this volume, it will be spread evenly across the drives,
and during the write, a parity bit will be written to help maintain the
copy of the data in case a drive is lost.
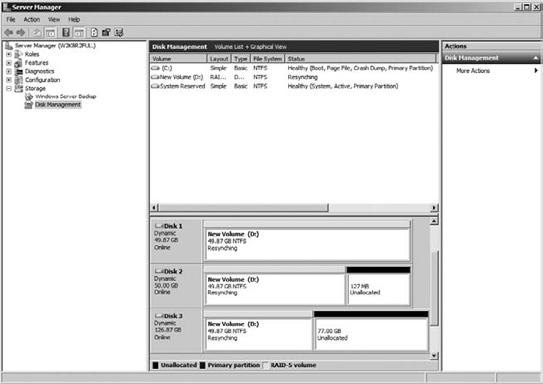
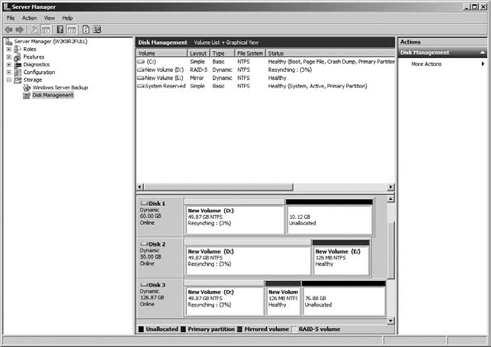
Figure 1 shows an example of a RAID 5 volume. Additionally, if you look at Figure 2,
you will see the drive and how it appears in My Computer. It is
important to note the drive is only about 100GB even though three 50GB
drives were used to create the volume.
2. Implement RAID
The number of drives or
volumes you have available to you will determine what level of RAID you
can implement. In this section, you will see how to create a RAID 5
volume with three drives in the Windows Server 2008 R2 software. If you
want to use a hardware solution to create RAID 5, please consult the
manufacturer of your system.
2.1. Create a RAID 1 or Mirrored Volume
Creating a mirrored volume
is similar to creating spanned and striped volumes. Additionally, like
with striped volumes, the partitions on the mirrored disks will be the
same size. Figure 3 shows an example of a mirrored volume.
Open Server Manager by selecting Start => Administrative Tools => Server Manager. In the Server Manager tree, click Storage. In Storage, click Disk Management.

Right-click the unallocated space in the bottom window of the middle pane you want to create the volume on. Click New Mirrored Volume. On the Welcome screen, review the message, and click Next. On
the Select Disks screen, select the disks you want to use for the
mirrored volume, and click Add to place them in the selected option. Select the size you want to make the volume, and click Next. Select
how you want mount the volume. You can choose to mount to a drive
letter, to mount a folder on an existing drive, or to not assign any
mount point. After you make your selection, click Next. Next, you can select how to format the drive. After you make your selection, click Next. Review the summary screen, and click Finish. You
will see a warning dialog box if the drives need to be converted to
dynamic drives for mirrored volumes. After you review the warning, click
Yes.
2.2. Repair a Mirrored Volume
If you lose a hard drive in a
mirror, the mirror has failed redundancy. You will need to replace the
failed drive, remove the existing mirror, and then re-create the mirror.
Open Server Manager by selecting Start => Administrative Tools => Server Manager. In the Server Manager tree, click Storage. In Storage, click Disk Management. Right-click the half of the mirror in the bottom window of the middle pane that is still working. Select Remove Mirror; you will a screen similar to Figure 4.

Select
the drive that has failed on your server to remove the mirror from.
When you remove the mirror for the drive, this will remove the mirror.
Then you are ready to re-create the mirror. To re-create the mirror, right-click and select Add Mirror. In the Add Mirror dialog box, select the new volume you want to create the mirror on. You
will see a warning dialog box if the drives need to be converted to
dynamic drives for mirrored volumes. After you review the warning, click
Yes. You will see the drive status of synching, and when the drive has completed the sync, you will see a status of Healthy.
2.3. Break a Mirror
You may choose to stop
using an existing mirror. Maybe you want to choose a different RAID
level or need to repurpose one of your disks for additional storage. You
can at any time break your mirror. You do not need to worry about seven
years' bad luck. Also, unlike when a real mirror breaks, you will not
lose any data. In fact, you will have two copies of the data on two
separate volumes.
Open Server Manager by selecting Start => Administrative Tools => Server Manager. In the Server Manager tree, click Storage. In Storage, click Disk Management. Right-click one of the volumes in the bottom window of the middle pane in the mirror. Select Break Mirrored Volume. Review
the warning about removing the fault tolerance from the drive.
Remember, you will not lose data, just the redundancy of the mirror.
Click Yes to break the mirror.
2.4. Create a RAID 5 or Striped Volume with Parity
After you have
determined which volumes you are going to use for your RAID 5 volume,
you will use Disk Management to create the RAID 5 volume:
Open Server Manager by selecting Start => Administrative Tools => Server Manager. In the Server Manager tree, click Storage. In Storage, click Disk Management. Right-click the unallocated space in the bottom window of the middle pane you want to create the volume on. On the Welcome screen, review the message, and click Next. On
the Select Disks screen, select the disks you want to use for the RAID 5
volume, and click Add to place them in the selected option. Remember,
you need at least three drives. Select the amount of space to allocate on each disk selected, and click Next. Select
how you want mount the volume. You can choose to mount to a drive
letter, to mount a folder on an existing drive, or to not assign any
mount point. After you make your selection, click Next. Next, you can select how to format the drive. After you make your selection, click Next. Review the summary screen, and click Finish. You
will see a warning dialog box if the drives need to be converted to
dynamic drives for striped volumes. After you review the warning, click
Yes.
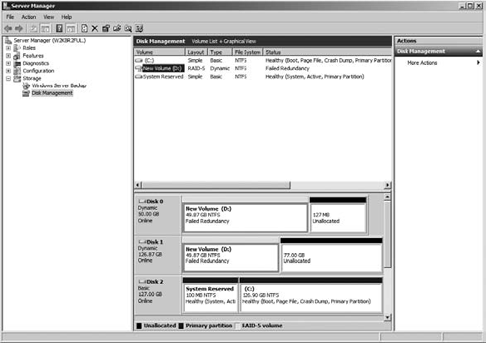
2.5. Repair a RAID 5 Volume
If you lose a hard drive in a
RAID 5 volume, you will need to repair the volume. When you are working
with Disk Management and see a screen similar to Figure 5, with the words failed redundancy,
one of your hard drives may have failed. To fix the RAID 5 volume, you
need to replace the failed drive and then use Disk Management to repair
the volume and reestablish redundancy.
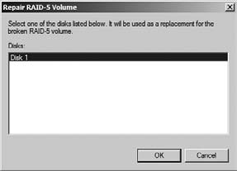
Open Server Manager by selecting Start => Administrative Tools => Server Manager. In the Server Manager tree, click Storage. In Storage, click Disk Management. Right-click one of the volumes, in the bottom window of the middle pane, in the existing RAID 5 set. You will see a screen similar to Figure 6, asking you which volume you want to use to repair the RAID 5 volume. Select the new hard drive, and click OK.
You
will see a warning dialog box if the drives need to be converted to
dynamic drives for striped volumes. After you review the warning, click
Yes. Your
drives will begin the process of resynching. This process could take
several minutes. During the resync process, you will see a screen
similar to Figure 7.
|

