This section introduces the security of a Web
application and the planning issues that present themselves as part of
this discussion. You will learn about three areas of security related to
Web applications: zones, authentication providers, and Web application security policies.
1. Zones
In SharePoint 2010 nomenclature, a zone is essentially an inbound vector to the content in a database that is accessed through a Web application. Don’t think of zones as any more complicated than this. SharePoint 2010 has five default inbound zones.
Default
Intranet
Extranet
Internet
Custom
An authentication provider, an
inbound URL (which can have alternate access mappings), and a Web
application are associated with each zone, along with security settings that apply to anyone using the defined inbound vector to access content in SharePoint 2010.
When you create a new Web
application, behind the scenes it is assigned to the Default zone with
minimal security settings at this Web application layer. To change the
security settings associated with the zone, you don’t go to the zone
directly because there is no administrative interface for zone management.
Instead, you manage zones through the other feature interfaces, and
when it is appropriate, the zone and security management settings will
appear to apply security at the Web application layer.
2. Authentication Providers
In SharePoint
2010, you can specify the underlying authentication provider for a
particular Web application’s zone. This can be useful when using a Web
application in a specific manner in which it makes sense to use an
authentication provider other than Active Directory.
For example, if you want to
expose a website in SharePoint to the Internet but quarantine the
authentication of anyone using the site from Active Directory, you might
decide to use forms-based authentication, which would allow users to
create their own user name and password combination, stored in a SQL
database, to support authentication only to that website.
The authentication providers that ship with SharePoint 2010 include
Windows
Forms
Web single sign-on
Windows Authentication treats
the user identity supplied by Microsoft Internet Information Services
(IIS) as the authenticated user in an ASP.NET application. IIS provides a
number of authentication mechanisms to verify user identity, including
anonymous authentication, Windows-integrated (NTLM) authentication,
Windows-integrated (Kerberos) authentication, Basic (base64 encoded)
authentication, Digest authentication, and authentication based on
client certificates.
Forms authentication
enables you to authenticate the user name and password of your users
using a login form that you create. Unauthenticated requests are
redirected to a login page, where the user provides credentials and
submits the form. If the application authenticates the request, the
system issues a ticket that contains a key for re-establishing the
identity for subsequent requests.
In the Web single
sign-on (SSO) design, users authenticate only once to Active Directory
to access multiple applications. Typically, you deploy this design when
you want to provide customer access to one or more ADFS-secured
applications over the Internet. With the Web SSO design, an organization
that typically hosts a secured application in a perimeter network can
maintain a separate store of customer accounts in the perimeter network,
which makes it easier to isolate customer accounts and employee
accounts.
Authentication providers are
assigned at the Web application layer and associated with a zone. Each
web application you create is automatically placed in the Default zone
and permissions are wide open on that zone.
3. How Zones, Web Applications, and Security Work Together to Provide Secure Solutions
In this section, you’ll see
how zones, Web applications, and security options can be combined to
provide a secure solution for a sample scenario: your company of 1000
SharePoint users is outsourcing the development work for your SharePoint
2010 farm to a Microsoft Certified Partner. Because of your company’s
security policy requirements, which forbid contractors from creating new
site collections using self-service site creation, you need to provide
secure access to your SharePoint farm to the contract developers while
allowing the SSSC right for your employees—but not for your contractors.
Assume that the URL location in which the contractors are working is http://portal,
because they are building out a new intranet portal for your company
based on requirements that are not relevant to our example.
First, you’ll need an existing Web application to work with. In this example, you have a new Web application called portal at http://portal.
Now, assume that users in your organization connect to this portal
through port 80 after having authenticated through Active Directory. The
portal is published on your firewall and is available for SSL (443
Secure Sockets Layer) access as well for your users. But you also want
to quarantine http://portal
to prevent your consultants from using it, and instead create a
different URL they can use to access the same content and customize it.
In addition, you want to place additional security (restrictions) on
what your users can do to http://portal after they have been authenticated.
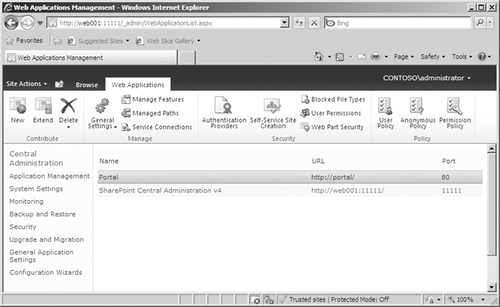
The first step in
accomplishing this scenario is to extend the portal Web application
using a different URL. Open a browser and go to Central Administration,
click the Application Management link, and then click the Manage Web
Applications link. Then highlight the name of the portal Web application
in the Web application list and click the Extend icon on the Ribbon (Figure 1).
When you click the Extend icon,
you are presented with a page that is similar to the New Web Application
page, except that you won’t be creating any databases. What you’re
doing is creating another IIS website that is provisioned by SharePoint
2010 with different configurations but is connected to the same set of
databases as that of the Web application that was highlighted when you
clicked the Extend icon. Another way to think about this is that you’re
creating a second inbound vector to those databases hosted by the
original Web application.
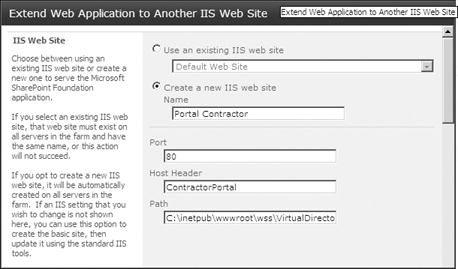
Figure 2
shows the top part of a page that will configure the extended website.
It can be a confusing page to work with if you don’t fully understand
what you’re doing. For example, you might try to create a new website
and then connect it to the Web application that you are trying to
extend. You should understand that by the time you get to this page, you
are already connected to the Web application that you want to extend,
and you need to create a new website to make this happen.
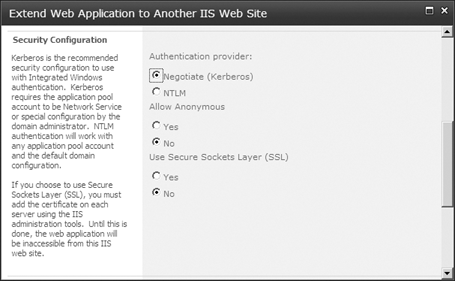
When you create the new
website that will extend an existing Web application, you will have a
chance to select the authentication provider. You are not required to
select the same authentication provider that was selected for the
default Web application. In fact, selecting a different authentication
provider for a different inbound vector is one of the main reasons that
you extend a Web application (Figure 3).
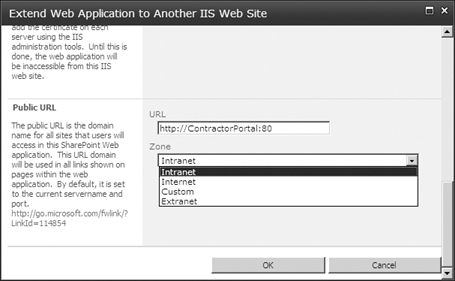
Finally, at the bottom of this
page, you’ll be able to select the default URL and zone for this
extended IIS website. Note that the default zone does not display,
because that one is already taken by the original Web application. Among
the four choices illustrated in Figure 4, Custom seems to be the correct choice, and is the one that should be selected.
You might think that there would be an interface to manage these extended Web
applications, but there is not. You manage extended Web applications
only when you are working with a Web application feature that needs to
expose the IIS website that extended this Web application.
Note:
BEST PRACTICES Be sure to document any Web applications that have been extended and make note of the authentication provider, zone assignment, and URL.
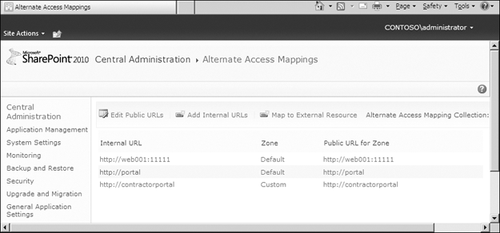
The one place in
SharePoint Central Administration where you can see your Web
applications and their extended IIS websites is the Alternate Access
Mappings page, shown in Figure 5.
However, you still need your documentation, because there is nothing in
this view that indicates which URLs are extension websites and which
are the root, default Web applications.
So in this scenario, now that you’ve extended the http://portal
Web application and assigned it to the custom zone, it’s time to secure
that extended Web application. For purposes of this example, you’ll
focus on two of the three configuration options: permission policy and
user policy; there is a brief explanation of the anonymous policy
option.
You want to restrict what the
contractors can do through their URL/zone assignments. The way to
configure this is to create the permission policy that you will then
assign to the Contractors user group. To create the permission policy,
click the Permission Policy icon on the page for the Web application
(the same page where you clicked the Extend icon earlier in this
example).
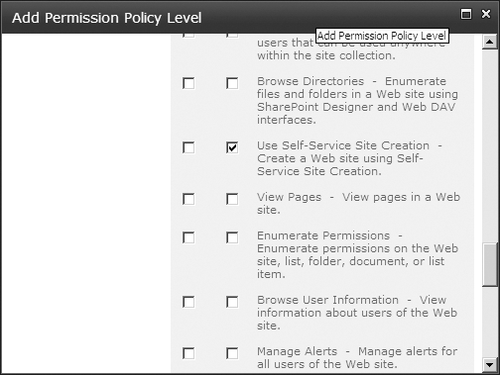
When you click the
Permission Policy icon, you are presented with the Manage Permission
Policy Levels page, where you click the Add Permission Policy Level link
to create a new permission policy. The Add Permission Policy Level page
shown in Figure 16-8 appears, and you need to understand the options presented on this page.
The first thing you need to do
is to give the new permission policy a name that is descriptive of what
the policy will enforce. Second, you’ll need to configure the site
collection level permissions. Two types of permission are available,
Administrator and Auditor. You can select both, either, or none of these
options. Selecting the Administrator option gives the permission policy
(and anyone assigned this policy) site collection administrator
privileges in all of the site collections within this Web application, as long as the person uses the extended inbound vector that you are configuring. Site collection Auditor permission
gives those individuals full read access to everything within the Web
application, as long as they use the extended inbound vector that you
are configuring to access the content. This is very useful for allowing
auditors to review content without giving them modify capabilities and
without having to visit each site collection within the Web application
to assign audit level permissions.

Scroll down this page to see
that you have the opportunity to grant or deny permissions. If your
compliance requirements include explicit deny permissions, this is place
to configure and enforce them. The permissions listed on this page
cannot be split up—this is as granular as they come in SharePoint 2010.
The permissions are
separated into three groups: List, Site, and Personal. You can create
any matrix of permissions for each policy permission level that you
need. Be sure to document what you create, because there is no default
reporting available in SharePoint 2010 for these permission policy
levels. You can review what you’ve done in the user interface (UI), but
if you are creating a plethora of these policies, it’s important to
document what you’ve done for faster reference. Also, be sure not to
select both grant and deny permissions on the same or different
permission policies that apply to the same groups. Doing so will negate
the grant permissions.
In the sample scenario, you are going to deny self-service
site creation (SSSC) permission to the Contract group because you don’t
want them to create new site collections within this Web application.
Assuming that you have configured SSSC for your company users, this will
ensure that employees can create new site collections but contractors
cannot (Figure 7).
Note:
You select the check boxes in the left column to grant selections and select check boxes in the right column to deny selections.
After saving this permission policy, Figure 8 illustrates that it will now be listed as an available permission policy to assign at the Web application layer.
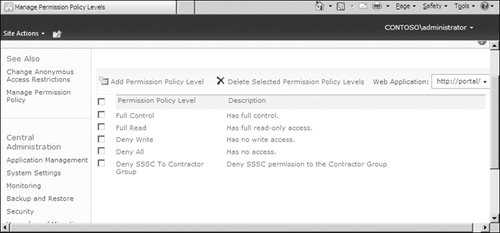
Note:
Permission policy levels are
unique to each Web application. When you create a new permission policy
level, it is assigned to the Web application that you are focused on.
There is no UI to copy permission policies between Web applications, so in the absence of custom code, you must re-create permission policies for each Web application.
At this point in the scenario,
you’ve done nothing to secure the extended Web application because you
have not assigned a user policy to the extended zone using the newly
configured Deny SSSC To Contractor Group permission policy. To do this,
you set your focus on the http://portal Web
application, click the User Policy button, and then select Add Users.
The Add Users page with a zone selection drop-down list appears (Figure 9), and you’ll use it to select the Custom zone. Note that only those zones that have existing websites will appear.

On the next page (Figure 10),
you’ll associate the permission level that you just created with the
Contractor’s Active Directory group, and this will complete the effort
to apply a permission to a group of users who are instructed to use a
different URL to access the portal content.

You might conclude that
you are not yet finished, because there is nothing in the UI to enforce
the instruction that contractors use their own URL to get the portal
content—and you would be correct. To force contractors to use the
contractor URL, you must create another permission policy level that
denies all access to all content on the default zone for the URL http://portal and assign it to the Contractors group.
By doing this,
when an individual who authenticates through Active Directory is
identified as a member of the Contractors group, the only way that
individual can access http://portal is to use the URL http://contractorportal, and her rights to SSSC will be denied.

