4. Changing Authentication Providers for a Web Application
Technically speaking,
you don’t change authentication providers for a Web application—you
change them for a Web application’s zone. But after the authentication
providers are made available, you can change them for a zone with a few
simple clicks.
In Central Administration, click the Manage Web
Applications link, select the Web application that you want to
configure, and then click the Authentication Providers icon on the
Ribbon. Note that the icons on the Ribbon will not be available until
you select a Web application.
When you click the
Authentication Providers icon, the Authentication Providers page
displays and you will be able to see the utilized zones. Click the zone you want to configure. When you do this, the Edit Authentication page displays, as shown in Figure 11.

On the Edit Authentication
page, you can see which zone you are configuring, but you’re not allowed
to change zones from this page. You can select the authentication
provider (called Authentication Type in the UI) you want to use. In this
scenario, neither the enabled forms nor the Web single sign-on (SSO)
options were selected, but if they had been, those two authentication
providers would be available for selection.
Note:
On the Edit Authentication
page, you must first select the Enable Anonymous Access option before
you can configure anonymous access using the Anonymous Access Policy
icon.
For anonymous policy
settings, click the Anonymous Policy icon on the Ribbon after selecting
the Web application that you want to configure. Then you can set
restrictions on anonymous access, including deny permission to write and
deny permission “to all.” The latter selection is a good way to ensure
that you explicitly deny access to those authenticated as anonymous
users for a particular zone (inbound vector). This is a positive way to
make sure that anonymous users come into the site only from the vector
you determine.
5. Managing Web Part Security
Even though you manage Web
Part security through Central Administration, this security setting is
applied at the Web application level. Web Part security at this level
focuses on three aspects.
Each of these configurations is
applied to a Web application so that you can allow, for example, Web
Part connections within one Web application but deny them in another Web
application. Figure 12 shows the page you use to set Web Part security within Central Administration.
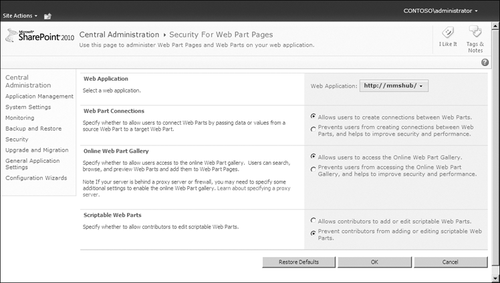
You can either allow or deny connections between Web Parts. The security
aspects of this decision derives from the fact that data can be passed
between Web Parts, which can be used maliciously to download information
from one Web Part to another. Because the connections operate within
the security
context of the application pool account for the Web application, some
content can be presented to users who should not see it if the
destination Web Part is not properly secured. Preventing Web Part
connections helps eliminate this problem.
The online Web Part gallery is
often turned off by SharePoint customers, even though it is turned on by
default when you install SharePoint 2010. The reason many people turn
off this feature is because they don’t want users to install external
Web Parts that have not been tested or approved in their environment.
Best practice is to download the Web Parts you need from the online Web
Part gallery and then turn off the feature and make the Web Parts you
selected available from an internal Web Part gallery from which users
can upload and install Web Parts in their sites.
Scriptable Web Parts allow a
developer to write code that can run within the browser of the user
visiting the website. Some code can cross-reference other content that
is open within a tabbed browser; however, this can create a potential
breach of security. Turning off this option will prevent scripts from
running from within Web
Parts and will improve the security of your deployment. This option is
turned off by default and should be left that way unless you have a
specific reason to enable scriptable Web Parts.
6. Self-Service Site Creation
Most people don’t think
of self-service site creation (SSSC) as a security feature because it is
intended to offer users a way to create new site collections without
having to loop through the IT department. Poorly named as the
self-service “site” creation feature, it actually enables SharePoint
users to create new site collections within a defined managed path and
Web application. One of the hallmarks of a highly collaborative platform
is that the collaboration spaces are easily created by the users at
their initiation and the transaction cost is very low. Both of these
elements are true for SharePoint 2010, but SSSC is turned off by
default.
|
Why would you want to enable SSSC
for a particular Web application and not for others? This is a design
decision that should be based on your business requirements for your
implementation of SharePoint 2010.
For example, does your
company need a Web 2.0-type of implementation in which end users can
create new collaboration spaces (without approval) for their own
purposes? If so, then you’ll need to implement SSSC.
In most designs, portions of the
overall SharePoint 2010 implementation need to be highly managed and
highly regulated. For example, an industry-specific process that moves
documents through various sites as part of the implementation of that
process within SharePoint will (in most scenarios anyway) require those
site collections to be centrally managed by IT. But other portions of
the overall implementation often ask for a “sandbox” or a “playground”
in which end users can create and delete their own collaboration spaces
as needed. SSSC was created specifically to fulfill this need.
SSSC should be viewed as an
asset and a positive step toward the overall implementation of
collaboration in SharePoint 2010. Certainly, not every implementation
will require SSSC, but for those who need robust collaboration driven by
end users, SSSC presents a good solution that your users will enjoy.
|
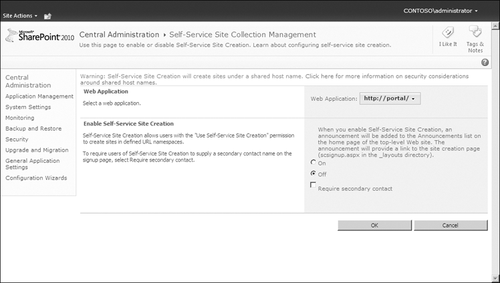
To enable SSSC, you need to
work both within Central Administration and at the site collection
level. First, within Central Administration, navigate to the Security
page (Security.aspx) by clicking the Security link in the left pane. On
the Security page, click the Configure Self-Service Site Creation link
within the General Security Group.
Figure 13 illustrates the default screen that you will see. Note that this security setting is applied at the Web
application layer, so the first step is to select the Web application
in which you which to enable SSSC. The second step is to select the On
option and then select the Require Secondary Contact check box. You’ll
select this option if you want to force end users to enter in another
account—not their own—to be a site collection owner of the site
collection they are creating using SSSC. In most instances, it is a best
practice to select this option because this will create two accounts in
which site collection ownership efforts can be exercised. This is
especially helpful when one of the two accounts (users) is away, on
assignment or on vacation, and owner level activities need to be
executed within the site collection, such as adding a new site
collection administrator.
After you have executed the
proper configurations within Central Administration, you are ready to
start letting your users create new site collections. This process is
not as intuitive as it could be, so please remember the following
information.
You don’t need to activate a feature at the site collection or site level to enable SSSC for your users.
Unlike Microsoft SharePoint Server 2007, there is no corresponding configuration at the site collection level to enable SSSC.
SSSC will be advertised in the root site collection of the Web application through an announcement in the Announcements Web Part, with a link to the site collection creation page (Figure 14).
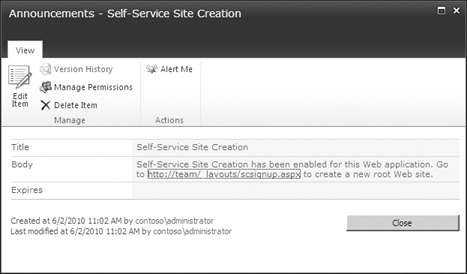
Any site that does not have an Announcements Web Part already created will not display the SSSC link.
For
any Web application in which SSSC is enabled, you can use the following
URL to create new site collections within that Web application.
http://<Name_of_Root_Site_Collection/_layouts/scsignup.aspx
What is helpful to
understand is that even though there might not be a visual change for
your end users when you enable SSSC for a given Web application, you can
still provide the default URL directly to your users to give them the
ability to create new site collections. Of course, you’ll need to create
the necessary managed paths within Central Administration.
Note:
One way to pass out the SSSC
URL is to use a Links list and enter the URL as a new content item with a
link name such as “Create A New Site” or something more appropriate for
your environment and then publish this link on the home page of your
root site collection for that Web application.
