The basics of public folder management are easy to
grasp. After all, a public folder is nothing more than a shared folder
that many people can access through Outlook. This section goes into the
essentials of public folder management and helps you understand the
basics.
1. Manage Public Folder Content
There are two parts to
managing public folders. One part entails managing the back-end
configuration of public folders. This includes things like managing the
databases, referrals, and replication. The other part of public folder
management is less complex, and it encompasses managing the behavior of
the folders. This section walks you through several key activities in
managing the behavior of public folders.
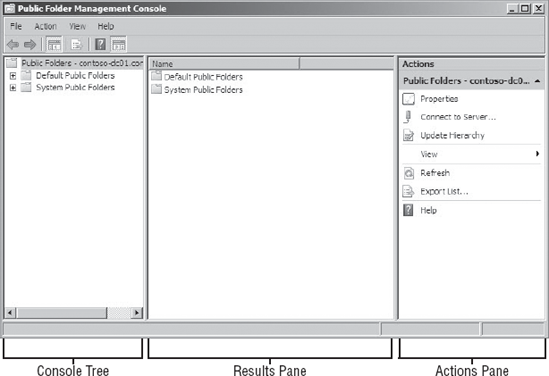
1.1. Understand the Public Folder Management Console
Just like the
Exchange Management Console (EMC), the Public Folder Management Console
(PFMC) is built on the Microsoft Management Console (MMC) version 3.0.
Both consoles contain the same components:
Console tree
Results pane
Actions pane
These components are laid out in Figure 1.
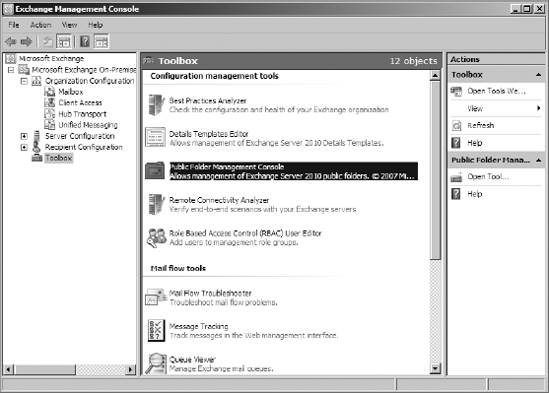
1.1.1. Launch the Public Folder Management Console
You can launch the PFMC from the EMC using the following steps:
Open the EMC and browse to the Toolbox node in the Console tree.
A
variety of tools are displayed in the Work area in the EMC. Browse down
to the Public Folder Management Console icon and double-click on it (Figure 2).
The PFMC will launch as a separate window. You can safely close the EMC if you don't want to keep it open while using the PFMC.
By default, the PFMC
will connect to the Exchange server that you are currently logged into.
If you want to connect to a different Exchange server, you can use the
following steps:
Select the top-level folder in the Console tree. This will be displayed in the format of Public Folders - <server that you are currently connected to>.
In the Actions pane, click the Connect To Server option.
In the Connect To Server dialog box, click the Browse button to find another Public Folder server that you want to connect to.
After
selecting your server, click the Connect button. You also have the
option of checking the Set As Default Server box to automatically
connect to this server whenever you open the PFMC again in the future.
When you select a public
folder from the Default Public Folders tree, the subfolders appear in
the Results pane in the center of the console. When a public folder is
selected, the actions that you can take on the public folder are
displayed in the Actions pane on the right. You can also access these
actions by right-clicking on the folder that you have selected. These
actions will appear in the drop-down menu.
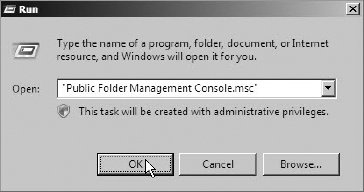
You can also open the PFMC without having to open the EMC first by using the following steps:
Type
"Public Folder Management Console.msc"
(with the quotes) and click OK, as shown in Figure 3.
The PFMC's Console tree in
the left pane displays a list of public folders in a hierarchy. The
Default Public Folders folder shows all of the user-accessible folders.
You can create new folders here that users can access and post items to.
The System Public Folders folder is reserved for Exchange to use
internally. The system folders are used for a variety of things, such as
Offline Address Book usage by clients older than Outlook 2007. The
system folders should not be modified.
1.1.2. Modify the Information Shown in the Results Pane
By default, the Results pane
only displays the name of the public folder and the path of its parent
folder. You can modify this to display more information. Table 1 shows the optional information that you can add to the list of results in the Results pane.
Table 1. Display Options for Folders in the PFMC
| Item | Description |
|---|
| Age Limit In Days | The number of days that content remains in the public folder before it is automatically deleted |
| Hidden From Address List | Displays True if this public folder appears in the Address List; displays False otherwise |
| Local Replica Age Limit In Days | The number of days that content remains on this specific public folder replica |
| Mail-Enabled | Displays True if the public folder has an email address associated with it, displays False otherwise |
| Replicas | Lists the servers that have a copy of this public folder |
To add this additional information to the view, follow these steps:
In the PFMC, click on the folder that you want to view from the Console tree.
Click the View option in the Actions pane and select Add/Remove Columns from the drop-down menu.
In
the Add/Remove Columns dialog box, select the information that you want
to add and click the Add button. You can also click Add All to add all
the information to the result list in the PFMC.
Click OK to close the dialog box and return to the PFMC.
Like the EMC, the PFMC has the
ability to log the PowerShell commands that it uses in the background.
This functionality is enabled in the PFMC in the same way that it's
enabled in the EMC.
1.2. Create a New Public Folder
Public folders can be created
by any authorized user in your Exchange organization. You can use these
tools to create public folders:
1.2.1. Create a New Public Folder Using the Public Folder Management Console
To create a public folder in the PFMC, follow these steps:
Open the Public Folder Management Console and select the Default Public Folders node from the Console tree.
Using
the Console tree, browse to the folder that you want to create the new
public folder in, or remain at the Default Public Folders node to create
a top-level folder.
In the Actions pane, select the New Public Folder option. This will launch the New Public Folder wizard.
At the New Public Folder initial screen, type the name of the folder in the Name field.
Click the New button to create the folder.
After the folder is successfully created, click the Finish button on the Completion screen.
1.2.2. Create a New Public Folder Using the Exchange Management Shell
To create a new public folder with the EMS, you can run the New-PublicFolder
cmdlet. The only parameter that you are required to specify in the
command is the name of the new public folder. However, if you only
specify the name, the public folder is created in the root. You can
specify the Path parameter to specify the parent folder for the new public folder. The following example creates a new folder called IT Support under the Business Units folder:
New-PublicFolder "IT Support" -Path "\Business Units"
When you use the EMS to
create the public folder, the folder is created on the server that you
are currently logged on to if it has a public folder store. If the
current server does not have a public folder database, the cmdlet uses
Active Directory site link costing to determine which Mailbox server is
the closest one with a Public Folder database. If you want to specify
which server the folder is created on, you can use the Server parameter
as demonstrated in this command:
New-PublicFolder "IT Support" -Path "\Business Units"
-Server CONTOSO-PF02
1.2.3. Create a New Public Folder Using Outlook
Public folders can be
created using Outlook, as long as the user has the appropriate
permissions. When creating folders in Outlook, users have the ability
not only to modify the permissions, but also to determine the type of
content that can be stored in the folder. Outlook is an extremely
flexible public folder management tool for end users managing content.
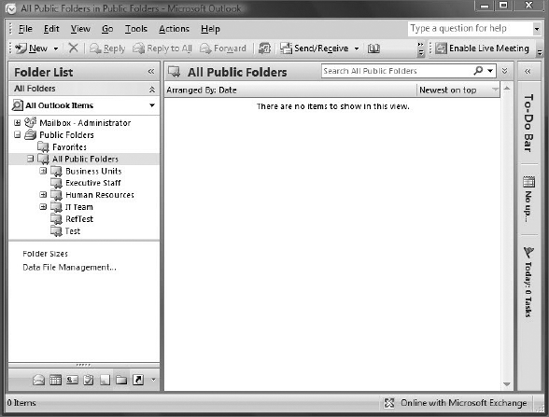
To create a public folder in Outlook, users can use the following steps:
Open Microsoft Outlook 2003 or newer and browse to the list of public folders in the Folder List, as shown in Figure 4.
Right-click
on the parent folder that you want to create the new public folder
under and select New Folder from the context menu.
In the Create New Folder dialog box, type the folder name in the Name field and click OK.
1.3. Allow a Public Folder to Receive Mail
A public folder can be
mail-enabled, allowing it to have a unique email address at which it can
receive mail. When a message is received by a mail-enabled public
folder, the message is stored in the folder and accessible by everyone
who has access to the folder.
When a public folder is
mail-enabled, the public folder object is given a mail alias and a
similar set of Active Directory attributes that other mail-enabled users
and contacts have. This mail-enabled public folder object also appears
in the address lists unless you explicitly hide it.
1.3.1. Mail-Enable a Public Folder Using the Public Folder Management Console
You can mail-enable public folders using the following steps in the PFMC:
Open the PFMC and browse to the parent folder of the public folder that you want to mail-enable.
The subfolders are displayed in the Results pane. Click on the subfolder that you are mail-enabling.
In the Actions pane, under the menu for that folder, click the Mail Enable option, as shown in Figure 5.

There is no prompt or dialog
box. The folder is immediately mail-enabled with a mail alias that is
generated by the server based on the name of the folder. The alias and
email are the name of the public folder minus any illegal characters,
such as spaces. For example, when mail-enabling the folder called Human
Resources, the mail alias becomes HumanResources and the email address
becomes HumanResources@contoso.com.
1.3.2. Mail-Enable or Disable a Public Folder Using the Exchange Management Shell
To mail-enable a public folder using the EMS, you can run the Enable-MailPublicFolder cmdlet. When you run this command, you only need to specify the path of the public folder. However, you can also use the HiddenFromAddressListsEnabled
parameter to specify whether the public folder shows up in the address
list. The following example mail-enables a public folder called Helpdesk
and hides it from the address lists:
Enable-MailPublicFolder "\Helpdesk"
-HiddenFromAddressListsEnabled $True
To disable the mail properties on a public folder, you can use the Disable-MailPublicFolder cmdlet. The following example disables mail on the Helpdesk folder without asking for confirmation:
Disable-MailPublicFolder "\Helpdesk" -Confirm:$False
1.4. Gather the Statistics of a Public Folder
You can obtain some
basic statistics about your public folders, such as the number of items,
the size of items, and the size of deleted items. When you gather this
information, you must connect to a server that has a copy of the
replica.
You can view this information in the PFMC by viewing the properties on an existing public folder:
Open the PFMC and select the Default Public Folders node in the Console tree.
Using the Console tree, browse to the parent folder that contains the public folder that you want to view the statistics for.
In the Results pane, click on the public folder that you want to view the statistics for.
In the Actions pane, click the Properties option under the Action menu that corresponds to the public folder.
In the properties dialog box for the public folder, click the Statistics tab to view the statistics.
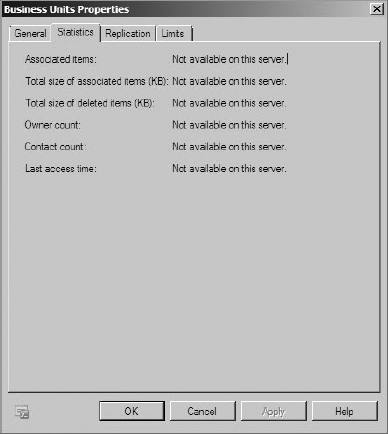
If you are not
connecting to the server that has a copy of the public folder, you will
receive the message "Not available on this server," as shown in Figure 6.
You will have to close the dialog box and connect to a server that
contains a copy of the public folder data in order to obtain the
statistics.
You can also gather additional statistics data using the EMS. The Get-PublicFolderStatistics and Get-PublicFolderItemStatistics cmdlets offer more information in addition to the data viewed in the PFMC. Get-PublicFolderStatistics can be used to output information about the public folder itself. On the other hand, Get-PublicFolderItemStatistics retrieves information about the items inside the public folder.
To output statistics about a
public folder, you can run the following command. If you are not
connected to a server that has a copy of this folder, you need to
specify the Server parameter. Otherwise, it can be left off. The
following example gets statistics about the Helpdesk folder on the
CONTOSO-PF02 server:
Get-PublicFolderStatistics "\Helpdesk" -Server CONTOSO-PF02
If you want to gather statistics on every item in a public folder, you can use the Get-PublicFolderItemStatistics
command. By default, this command will display the identity of each
item in the public folder along with the timestamp of when it was
created and the subject line. The following example gets statistics
about all the items in the Helpdesk folder:
Get-PublicFolderItemStatistics "\Helpdesk"
1.5. Maintain Per-User Message Read State
Since public folders are
accessed by many people, changes to the content in the folder can affect
how others view the content as well. If a user deletes a message, other
users will not see the message. One property of the items in a public
folder that can be controlled is per-user message read state.
When this is turned on, a different message read state is maintained
for each user. When a user reads a message in the public folder, that
message is marked as read-only by that user. When per-user message read
state is turned off, the message is marked as read for everybody who
views the folder.
To enable or disable the per-user message read state in the PFMC, use the following steps:
Open the PFMC and select the Default Public Folders node in the Console tree.
Select the parent folder that contains the public folder that you want to modify from the Console tree.
In the Results pane, select the public folder that you want to modify and click the Properties option in the Actions pane.
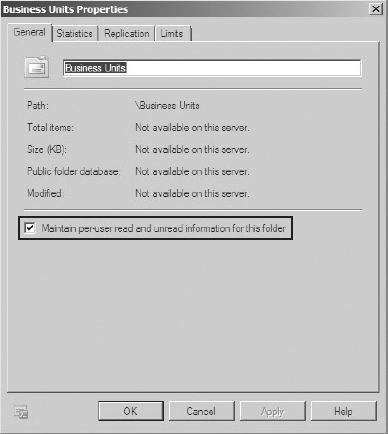
In the properties dialog box for the public folder, click the General tab.
To
enable per-user message read state, select the Maintain Per-User Read
And Unread Information For This Folder check box, as shown in Figure 7.
Click OK to make the changes and close the properties dialog box.
This option can also be enabled or disabled in the EMS, using the Set-PublicFolder cmdlet with the PerUserReadStateEnabled parameter set to either $True or $False. The following example turns off the per-user message read state on the Helpdesk folder:
Set-PublicFolder "\Helpdesk" -PerUserReadStateEnabled $False
1.6. Impose Size Limits and Warnings on a Folder
In a similar manner to
mailboxes, public folders can have limits defined, which prevent a
folder from getting too big. Here are the three options for limiting a
public folder size:
Issue a warning when a folder reaches a particular size.
Prevent posting new content when a folder reaches a particular size.
Define the maximum size allowed for a single item in the folder.
By default, each public
folder inherits these values from the setting on the database. However,
you can override this inheritance on a per-folder basis.
To change the limits on a per-folder basis using the PFMC, follow these steps:
Open the PFMC and select the Default Public Folders node in the Console tree.
Select the parent folder that contains the public folder that you want to modify from the Console tree.
In the Results pane, select the public folder that you want to modify and click the Properties option in the Actions pane.
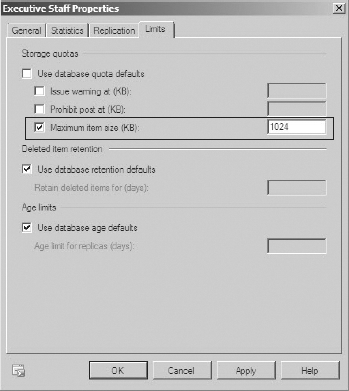
In the properties dialog box for the public folder, click the Limits tab.
Uncheck the Use Database Quota Defaults option.
Place
a checkmark next to the limits that you want to define. In the field
next to the limit, enter the size restriction that you want to enforce
in KB. For example, to limit posts to 1 MB in size, enter 1024 in the Maximum Item Size (KB) box, as shown in Figure 8.
After
you configure the limits that you want to impose, click the OK button
to make the changes and close the properties dialog box.
To define these limits using the EMS, you will use the Set-PublicFolder cmdlet. Table 2 displays the parameters to correspond to the limits in the PFMC.
Table 2. EMS Parameters for Defining Public Folder Limits
| PFMC Option | EMS Parameter |
|---|
| Issue Warning At (KB) | IssueWarningQuota |
| Prohibit Post At (KB) | ProhibitPostQuota |
| Maximum Item Size (KB) | MaxItemSize |
When you run the cmdlet, you will also need to set the UseDatabaseQuotaDefaults parameter to $False
in order to override the limits set on the database. If you don't set
this, the public folder's limit attributes will be set in Active
Directory (AD), but the database limits will still be effective. For
example, the following command will override the database defaults and
set the maximum post size to 1 KB:
Set-PublicFolder "\Helpdesk" -MaxItemSize 1KB
-UseDatabaseQuotaDefaults $False
