2. Windows Defender Alert Levels
When Windows Defender detects potentially malicious software, it assigns one of the following alert levels to it:
Severe
Assigned to potentially unwanted software that can severely affect your
computer or compromise your privacy. You should always remove this
software. High Similar to the severe rating, but slightly less damaging. You should always remove this software. Medium
Assigned to potentially unwanted software that might compromise your
privacy, affect your computer’s performance, or display advertising. In
some cases, software classified as a medium alert level might have
legitimate uses. Evaluate the software before allowing it to be
installed. Low
Assigned to potentially unwanted software that might collect
information about you or your computer or change how your computer
works, but operates in agreement with licensing terms displayed when you
installed the software. This software is typically benign, but might be
installed without the user’s knowledge. For example, remote control
software might be classified as a Low alert level, because it could be
used legitimately, or it might be used by an attacker to control a
computer without the owner’s knowledge. Not yet classified Programs
that haven’t yet been analyzed. If you discover software that is not
yet classified, you can submit it directly to Microsoft to be considered
for classification. For more information, visit http://www.microsoft.com/athome/security/spyware/software/support/reportspyware.mspx.
3. Understanding Microsoft SpyNet
Microsoft’s goal is to create definitions for
all qualifying software. However, hundreds of new malware applications
are created and distributed every day. Because of the rapid pace of
newly released software, users can possibly encounter malware that
Microsoft has not yet classified. In these cases, Windows Defender
should still warn the user if the malware takes a potentially malicious
action such as configuring itself to start automatically each time the
computer is restarted.
To help users determine whether to allow
application changes (detected by real-time protection) when prompted,
Windows Defender contacts Microsoft SpyNet to determine how other users
have responded when prompted about the same software. If the change is
part of a desired software installation, most users will have approved
the change, and Windows Defender can use the feedback from SpyNet when
informing the user about the change. If the change is unexpected (as it
would be for most unwanted software), most users will not approve the
change.
Two levels of SpyNet participation are available:
Basic
Windows Defender sends only basic information to Microsoft, including
where the software came from (such as the specific URL) and whether the
user or Windows Defender allowed or blocked the item. With basic
membership, Windows Defender does not alert users if it detects software
or changes made by software that has not yet been analyzed for risks.
While personal information might possibly be sent to Microsoft with
either basic or advanced SpyNet membership, Microsoft will not use this
information to identify or contact the user.
Advanced
Advanced SpyNet membership is intended for users who have an
understanding of the inner workings of the operating system and might be
able to evaluate whether the changes an application is making are
malicious. The key difference between basic and advanced membership is
that with advanced membership, Windows Defender will alert users when it
detects software or changes that have not yet been analyzed for risks.
Additionally, advanced membership sends additional information to
SpyNet, including the location of the software on the local computer,
file names, how the software operates, and how it has affected the
computer.
In
addition to providing feedback to users about unknown software, SpyNet
is also a valuable resource to Microsoft when identifying new malware.
Microsoft analyzes information in SpyNet to create new definitions. In
turn, this helps slow the spread of potentially unwanted software.
3. Configuring Windows Defender Using Group Policy
You can configure some aspects of Windows
Defender using Group Policy settings. Windows Defender Group Policy
settings are located in Computer Configuration\Administrative
Templates\Windows Components\Windows Defender. From that node, you can
configure the following settings:
Turn On Definition Updates Through Both WSUS And Windows Update
Enabled by default, this setting configured Windows Defender to check
Windows Update when a WSUS server is not available locally. This can
help ensure that mobile clients, who might not regularly connect to your
local network, can stay up to date on malware definitions. If you
disable this setting, Windows Defender only checks for updates using the
setting defined for the Automatic Updates client—either an internal
WSUS server or Windows Update. |
Keeping up to date with the current malware
definitions can help protect your computer from harmful or potentially
unwanted software. Microsoft has taken several steps to create
definition updates, including gathering new samples of suspicious files,
observing and testing the samples, and performing a deep analysis. If
we determine that the sample does not follow our criteria, its alert
level is determined and the software is added to the software
definitions and released to customers.
For more information, visit http://www.microsoft.com/athome/security/spyware/software/msft/analysis.mspx.
Sterling Reasor, Program Manager
Windows Defender
|
Check For New Signatures Before Scheduled Scans
Disabled by default, you can enable this setting to cause Windows
Defender to always check for updates prior to a scan. This helps ensure
that Windows Defender has the most up-to-date signatures. When you
disable this setting, Windows Defender still downloads updates on a
regular basis, but will not necessarily check immediately prior to a
scan. Turn Off Windows Defender
Enable this setting to turn off Windows Defender Real-Time Protection
and to remove any scheduled scans. You should only enable this setting
if you are using different anti-malware software. If Windows Defender is
turned off, users can still manually run the tool to scan for
potentially unwanted software. Turn Off Real-Time Protection Prompts For Unknown Detection
If you enable this policy setting, Windows Defender does not prompt
users to allow or block unknown activity. If you disable or do not
configure this policy setting, by default Windows Defender prompts users
to allow or block unknown activity on the computer. Enable Logging Known Good Detections
By default, Windows Defender only adds an event to the Event Log when
it detects a potentially malicious file. If you enable this setting (it
is disabled by default), Windows Defender will also log files that it
determines are not a problem. You should only enable this setting if you
are troubleshooting a problem. In fact, enabling this setting will
cause a large number of events to be added to the computer’s event log,
causing performance problems. Enable Logging Unknown Detection
Enabled by default, this setting configures Windows Defender to add
events to the Event Log when it finds a potentially malicious file
during Real-Time Protection. Disable this setting if you do not find the
events useful. Download Entire Signature Set
By default, this setting is disabled, which causes Windows Defender to
download only incremental signature updates (in other words, just the
new signatures since it downloaded them last). If you enable this
setting, Windows Defender will download the full signature set, which
could be very large. Because downloading the full signature set will use
more network bandwidth, you should only enable this setting when
troubleshooting a problem with signatures. Configure Microsoft SpyNet Reporting
Microsoft SpyNet is the online community that helps users choose how to
respond to potential spyware threats that Microsoft has not yet
classified by showing users how other members have responded to an
alert. When enabled and set to Basic or Advanced, Windows Defender will
display information about how other users responded to a potential
threat. When enabled and set to Basic, Windows Defender will also submit
a small amount of information about the potentially malicious files on
the user’s computer. When set to Advanced, Windows Defender will send
more detailed information. If you enable this setting and set it to No
Membership, SpyNet will not be used, and the user will not be able to
change the setting. If you leave this setting Disabled (the default),
SpyNet will not be used unless the user changes the setting on his local
computer.
Windows Defender Group Policy settings are
defined in WindowsDefender.admx, which is included with Windows Vista.
4. Configuring Windows Defender on a Single Computer
Besides
the settings that you can configure by using Group Policy, Windows
Defender includes many settings that you can only configure by using the
Windows Defender Options page on a local computer. To open the Options
page, launch Windows Defender, click Tools, and then click Options. Some
of the settings you can configure from this page include:
Frequency and time of automatic scans Which security agents are automatically scanned Specific files and folders to be excluded from scans Whether non-administrators can run Windows Defender
Because you cannot easily configure these
settings with Group Policy settings, Windows Defender might not be the
right choice for enterprise spyware control.
5. Windows Defender Tools
Windows Defender includes several useful tools that you can access by clicking Tools on the Windows Defender toolbar:
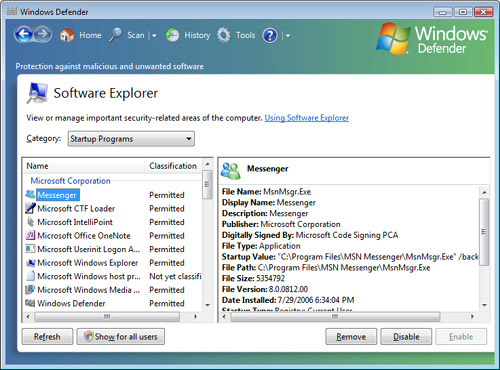
Software Explorer
It’s very difficult to track software installed on a computer because
it can be installed in many different places. For example, startup
programs can be installed as services, referenced in several different
registry locations, or added to a user’s (or all users’) Startup group.
Software Explorer, as shown in Figure 3,
allows you to browse and disable applications installed on your
computer. You can also use Software Explorer to view and terminate
running processes (much like Task Manager), to browse running processes
that are currently networked, and to browse Winsock Service Providers.
Allowed Items
Use the Allowed Items tool in Windows Defender to view items that an
administrator has configured as safe. Windows Defender will not alert
the user about changes made by items on this list. Quarantined Items
Use the Quarantined Items tool in Windows Defender to view items that
an administrator has configured as unsafe. If you are having a problem
installing an application, it’s possible that it has been mistakenly
added to the Quarantined Items list. You need administrative privileges
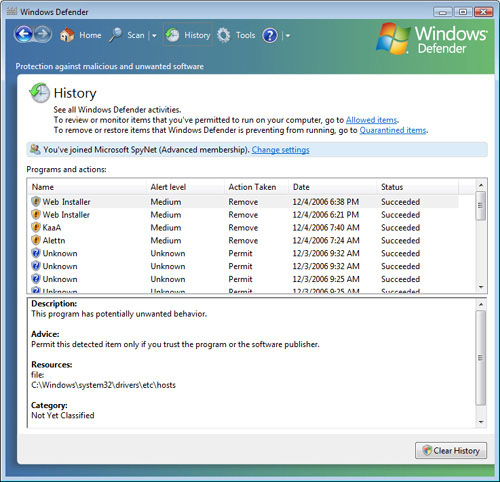
to manage this list. History
Available by clicking History on the Windows Defender toolbar, this
tool displays changes that Windows Defender either allowed or blocked,
and whether Windows Defender prompted the user for approval. If you are
experiencing problems installing an application or making system
changes, you should check the history, as shown in Figure 4, to determine if Windows Defender might be involved.
6. How to Determine if a Computer Is Infected with Spyware
Several
signs indicate whether a computer is infected with spyware. You should
train users in your environment to notice these changes and call your
support center if they suspect a malware infection:
A new, unexpected application appears. Unexpected icons appear in the system tray. Unexpected notifications appear near the system tray. The web browser home page, default search engine, or favorites change. The mouse pointer changes. New toolbars appear, especially in web browsers. The
web browser displays additional advertisements when visiting a webpage,
or pop-up advertisements appear when the user is not using the web. When the user visits a webpage, he is redirected to a completely different webpage. The
computer runs more slowly than usual. This can be caused by many
different problems; however, malware is one of the most common causes.
Some malware might not have any noticeable
symptoms, but it still might compromise private information. For best
results, run Windows Defender real-time protection with daily quick
scans.
7. Best Practices for Using Windows Defender
To receive the security benefits of Windows Defender while minimizing the costs, follow these best practices:
Teach users how malware works and the
problems that malware can cause. In particular, focus on teaching users
to avoid being tricked into installing malware by social engineering
attacks. Before deploying Windows Vista,
test all applications with Windows Defender enabled to ensure that
Windows Defender does not alert users to normal changes the application
might make. If a legitimate application does cause warnings, add the
application to the Windows Defender allowed list. Change
the scheduled scan time to meet the needs of your business. By default,
Windows Defender scans at 2 A.M. If third-shift staff uses computers
overnight, you might want to find a better time to perform the scan. If
users turn off their computers when they are not in the office, you
should schedule the scan to occur during the day. While the automatic
quick scan can slow down computer performance, it typically takes fewer
than 10 minutes, and users can continue working. Any performance cost is
typically outweighed by the security benefits. Use WSUS to manage and distribute signature updates. Use
antivirus software with Windows Defender. Alternatively, you might
disable Windows Defender completely and use client-security software
that provides both antispyware and antivirus functionality. Do
not deploy Windows Defender in enterprises. Instead, use Microsoft
Forefront Client Security or a third-party client-security suite that
can be more easily managed in enterprise environments.
8. How to Troubleshoot Problems with Unwanted Software
If
a malware infection is found during a scan, Windows Defender will
prompt the user to choose how to respond. Typically, the user should
allow Windows Defender to attempt to remove the malware.
A malware infection is rarely a single
application; most successful malware infections automatically install
several, even dozens, of malicious applications. Some of those
applications might be straightforward to remove. However, if even a
single malicious application remains, that remaining malware application
might continue to install other malware applications.
If you detect a malware problem, follow these steps to troubleshoot it:
1. | Perform
a quick scan, and remove any potentially malicious applications. Then,
immediately perform a full scan, and remove any additional potentially
malicious software. The full scan can take many hours to run. Windows
Defender will probably need to restart Windows Vista.
| 2. | If the malware has made changes to Internet Explorer, such as adding unwanted add-ons or changing the home page.
| 3. | Run
antivirus scans on your computer. Often, spyware might install software
that is classified as a virus, or the vulnerability exploited by
spyware might also be exploited by a virus. Window Defender cannot
detect or remove viruses. Remove any viruses installed on the computer.
| 4. | If
you still see signs of malware, install an additional antispyware and
antivirus application. With complicated infections, a single
anti-malware tool might not be able to completely remove the infection.
Your chances of removing all traces of malware increase by using
multiple applications, but you should not configure multiple
applications to provide real-time protection.
| 5. | If
problems persists, shut down the computer, and use the Startup Repair
tool to perform a System Restore. Restore the computer to a date prior
to the malware infection. System Restore will typically remove any
startup settings that cause malware applications to run, but it will not
remove the executable files themselves. Use this only as a last resort:
Although System Restore will not remove a user’s personal files, it can
cause problems with recently installed or configured applications.
|
These steps will resolve the vast
majority of malware problems. However, once malware has run on a
computer, you can never be certain that the software is completely
removed. In particular, malware known as root kits
can install themselves in such a way that they are undetectable on a
computer. In these circumstances, the only sure way to remove the
malicious software is to reformat the hard disk, reinstall Windows
Vista, and then restore user files using a backup created prior to the
infection.
|
