1. Customizing Games Explorer
In addition to the Set up game updates and options
window, which is accessible from the Games toolbar menu item, there are
a number of ways in which you can configure the Games Explorer in
Windows 7.
New to Windows 7 is the More Games from Microsoft
link in Games Explorer. When you double-click this icon, Internet
Explorer (or your browser of choice) opens and navigates to the
Microsoft Web site, as shown in Figure 6.
From this page, you can explore Microsoft's nonbundled game options,
which include a wide variety of online and downloadable games, some of
which are free.

At the time of this writing, Microsoft's online PC
game options were spread between three services: MSN Games, Windows
Live Messenger, and Games for Windows - LIVE Messenger. The first two
options include mostly casual games—card games such as Uno, board games
like Checkers, and the like. Games for Windows, however, is far more
involved and includes expensive retail offerings.
|
MSN is one of several Microsoft online services.
Windows Live Messenger is Microsoft's instant messaging client and part
of the Windows Live Essentials suite that "completes" Windows 7.
|
|
Games on MSN Games and Games for Windows - LIVE
Messenger will typically run in a browser window, accompanied by ads,
but they also offer you the opportunity to compete against other people
online. A typical MSN Games title, Bubble Town, is shown in Figure 7.

1.1. Sorting the View
You probably already know that Windows Explorer
supports various icon view styles, such as Large Icons, Tiles, and the
like. And it's probably no stretch for you to realize then that the
Games Explorer also supports all of these view styles, enabling you to
customize the window exactly the way you want it. This is Windows 101
stuff, folks.
What may be less obvious, however, is that you can
also modify the Games Explorer view in far more useful ways. We
mentioned previously that one of the things that Windows 7 will
track—if you want it to—is which games you play most frequently, as
well as which games you've played most recently. You can use this
information—as well as related information, such as which games have
been provided updates by their publishers most recently—to display your
games in ways that may be more meaningful to you.
The trick, as is the case in any Explorer window, is
to utilize right-click and the various Sort By and Group By options.
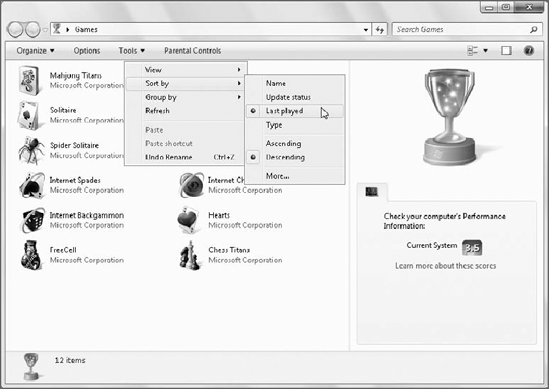
For example, you can sort the game icons in Games Explorer by Last
played so that the games you've played most recently are at the top of
the window. You can also use the system's grouping options, if desired,
to segregate the icons into date-related groups such as Today,
Yesterday, Last Week, and the like. In Figure 8, you can see that the Games Explorer has been customized to show the most recently played games at the top.

1.2. Adding and Removing Built-In Games
While the selection of games that come with Windows
7 is pretty decent, you may not want one or more of them installed.
Likewise, your PC maker may have chosen to leave some games uninstalled
for whatever reason—perhaps to push their own subscription game
offerings. In either case, you can customize the games that appear in
Games Explorer by installing or uninstalling individual titles so that
only the ones you want appear.
To do so, you'll need to access the Windows Programs
applet, which is part of the Control Panel. Open the Start menu and
select Control Panel. In the Control Panel window, select Programs and
then Turn Windows features on or off. (If the Control Panel is
displaying an old-school grid of icons, choose Program and Features and
then Turn Windows features on or off.)
|
If you're already viewing the Games Explorer, you
get to this view more quickly by clicking the Tools toolbar menu item
and then Programs and Features.
|
|
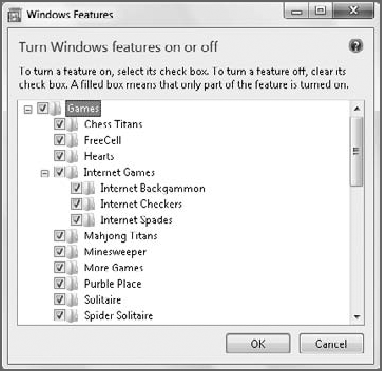
Either way, you should now see the Windows Features window, shown in Figure 9.

Windows Features doesn't let you uninstall (or
install) every single Windows feature, but it does provide a far wider
range of options in Windows 7 than it has in several previous Windows
versions. To see which games are available on your system, expand the
Games option. As shown in Figure 10, you have a number of options, though what you see here will vary depending on which Windows 7 product edition you're using.

To uninstall a game, uncheck the box next to its
name. Likewise, you can install a missing game by checking the box next
to its name. Once you've made your choices, click OK and Windows 7 will
make the changes. These changes will be reflected in Games Explorer
when the process is complete.
NOTE
Users of touch-compatible computers running
Windows 7 may see additional games installed, courtesy of Microsoft's
Touch Feature Pack for Windows 7. This package of applications is
typically provided via your PC maker and includes Microsoft Blackboard,
a fun physics-based puzzle game; Microsoft Rebound, an electronic air
hockey-type title; and Microsoft Garden Pond, in which you guide
origami creatures across a pond by rippling the water via touch-based
gestures.
For more information about the Touch Feature Pack
for Windows 7, please visit the SuperSite for Windows: Paul has the
complete rundown.
www.winsupersite.com/win7