1. Directing Your Computer with Voice Commands
Windows Vista includes a powerful
speech-recognition program that makes it possible for you to use your
voice to command the computer. Although speech recognition is designed
primarily for people who have difficulty using the keyboard and/or the
mouse, the ability to direct Windows and your other programs with your
voice has a certain authoritative appeal. And, as with the mouse or the
keyboard, there are numerous ways to accomplish any specific task.
Start Speech Recognition
- 1. Start Windows Speech Recognition from the Start menu if it isn’t
already running. If it’s running but sleeping, say “Start listening.”
- 2. Use the commands that you learned in the tutorial or from Help. If you
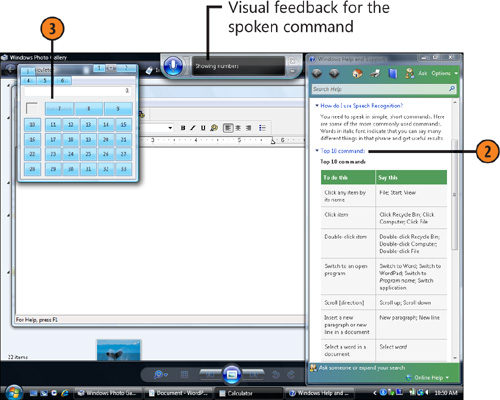
can’t remember a command, say “What can I say?” to display Windows Help
And Support, which lists all the commands you can use.
- 3. If you want to access something in a window but can’t figure out how,
say “Show numbers.” Say the number for the item, and then say “OK.”

Use the Commands
| To do this | Say this |
|---|
| Start a program | “Start,” and then the name of the program. | | Open the Start menu | “Start.” | | Open a menu in a program or window | The name of the menu. | | Activate a toolbar button | The name of the button. | | Activate a link | The name of the link. | | Click an item | “Click,” and then the name of the item. | | Use the equivalent of keystrokes | “Press,” and then the name of the key or the name of the keyboard shortcut. | | Switch to a program | “Switch to,” and then the name of the program. | | Scroll in a window | “Scroll down” or “Scroll up.” | | Scroll a specific number of lines | “Scroll,” and then the number of lines. | | Move the speech-recognition program out of the way | “Move speech recognition.” | | Work without using speech recognition | “Stop listening.” |
Tip You
must go through a full setup process prior to using the
speech-recognition program for the first time, including setting up your
microphone and stepping through a tutorial that teaches you the basics
of using speech recognition. |
Caution Don’t
skip the tutorial! As you work your way through it, the
speech-recognition program is learning to understand your voice and the
way you pronounce words. If you skip the tutorial, the
speech-recognition program won’t be very effective. |
2. Dictating Text
The
speech-recognition program lets you issue commands to your computer and
dictate text in a document. Of course, while you’re dictating, you’ll
also be issuing some commands—for example, telling the computer to
correct or change some words, to start paragraphs, and to scroll through
the document. Fortunately, the speech-recognition program is usually
smart enough to know when you’re dictating text and when you’re issuing
commands. Even if the speech-recognition program gets something wrong,
however, you can easily correct it.
Dictate Your Text
- 1. In a document that accepts text, start dictating your text. If the
speech-recognition program is sleeping, say “Start listening” before you
start dictating.
- 2. Speak as you did in the tutorial, pausing only after completing a
phrase or sentence. The text will be inserted after a brief pause. Do
any of the following in the table at the right:
Use the Commands
| To do this | Say this |
|---|
| Insert a punctuation mark | The name of the mark—“Period, comma, question mark,” and so on. | | Insert a number | The name of the number. | | Insert special characters | The name of the character—“Double quote, open parenthesis, close parenthesis, hyphen, ampersand,” and so on. | | Insert an unusual name or word | Spell the word one letter at a time. | | Start a new paragraph | “Enter.” | | Undo your last entry | “Undo.” | | Move the insertion point around in a document | The type of move—“End, backspace, move down two lines,” and so on. | | Select text | “Select,” and then the word or range—“Sentence” or “paragraph.” | | Apply formatting or other items on a toolbar | The
name of the item—“Bold, italic,” and so on. If you don’t know the name
of the item, say “Show numbers,” say the number of the item, and then
“OK.” | | Figure out how to enter or edit something if you can’t remember the command | “What can I say?” and then review the Help file. |
Correct Errors
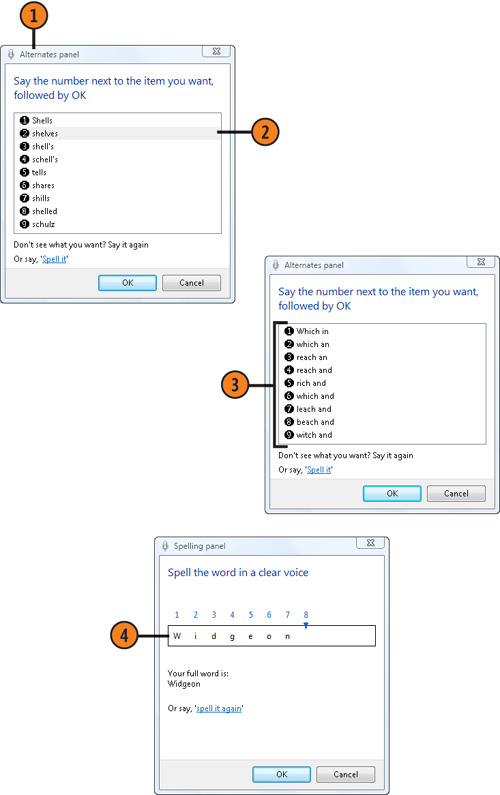
- 1. Say “Correct” and then the word or phrase that needs to be corrected to display the Alternates Panel.
- 2. Say the number of the correct item, and then say “OK.” If the correct
word or phrase doesn’t appear in the Alternates Panel, say the word or
phrase again, say the number of the correct item, and then say “OK.”
- 3. If you’re trying to correct a word that the program never recognizes, say “Spell it.”
- 4. In the Spelling Panel that appears, spell the word slowly, one letter
at a time. If you make a mistake, say the number of the wrong letter,
and then say the correct letter. If a letter is routinely misunderstood,
say it with an example, such as “H as in hotel.” When the spelling is
correct, say “OK.”
- 5. If the Add Word To Dictionary dialog box appears, specify whether you
want to add the word to the dictionary used to identify spoken words, or
whether you want to insert the word just this time.

Tip Dictating
text can be quite frustrating when you first start, but, as you use the
program, both you and the program get better. Also, for better
recognition, you can do some additional speech training. |
Tip To
directly add, delete, or correct words in the dictionary, say “Show
speech options,” and, when the shortcut menu appears, say “Open the
speech dictionary.” |
|