When
it comes to creating groups, understanding the characteristics and
limitations of each different type and scope is only half the battle.
Other points to consider for group creation are how the group will be
used and who will need to be a member of the group. A group is commonly
used for three separate functions, including delegating administrative
rights, distributing email, and securing network resources such as file
shares and printer devices. To help clarify group usage, the following
examples show how the different groups can be used in different
administrative scenarios.
User Administration in a Single Domain
If a group is needed to
simplify the process of granting rights to reset user passwords in a
single domain, either a domain local or global security group would
suffice. The actual domain user rights should have local groups applied
only to their access control lists or settings, but these local groups
should have global groups as members. For a single-domain model, if the
specific user rights need to be granted only at the domain level, a
domain local group with users as members would be fine. However, if you
need to add the same group of users to an access control list on a
member server resource or you need to create a completely new domain,
the domain local group cannot be used. This is the main reason it is
recommended to place users only into global groups and assign
permissions to resources using local groups that have global groups as
members. After you use this strategy and use global groups over and
over, saving administration time, the reasoning will be validated.
Note
With current
group management mechanisms including most domains moving out of “Mixed
mode” into at least Windows 2003 Native mode, the use of universal
groups is more common. Also with Exchange 2007 and Exchange 2010
effectively requiring universal groups as distribution lists, the
default group in an enterprise tends to be the de facto group in place
of global groups in the past.
User Administration Across a Forest of Domains
When
multiple domains need to be supported by the same IT staff, even if the
domain levels are set to Windows 2000 Mixed mode, each domain’s Domain
Admins group should be added to each domain’s Administrators group. For
example, domain A’s Administrators group would have Domain A Domain
Admins, Domain B Domain Admins, and Domain C Domain Admins groups as
members. You would need to add these domains whenever a resource or
administrative task needs to grant or deny groups from each domain
access to a resource in the forest.
If all the domains in the forest
run in Windows 2000 Native, Windows Server 2003, or Windows Server 2008
R2 functional level, you could create a universal security group named
“Forest Admins” with each of the domain’s Domain Admin groups as
members. Then you would need to configure only a single entry to allow
all the administrators access forestwide for a particular resource or
user right. Universal security groups are preferred because they can
have members from each domain, but if the group strategy necessitates
their use, domain local and domain global groups could still handle most
situations.
Domain Functional Level and Groups
There are many different
domain functional levels, with each level adding more functionality. The
reason for all the different levels is to provide backward
compatibility to support domain controllers running on different
platforms. This allows a phased migration of the domain controllers. The
four domain functional levels are as follows:
Windows 2000 Native—
This domain level allows only Windows 2000, Windows Server 2003,
Windows Server 2008, and Windows Server 2008 R2 domain controllers in
the domain. Universal security groups can be leveraged, along with
universal and global security group nesting. This level can be raised to
Windows Server 2003 Native level, which also enables you to change some
existing groups’ scopes and types on the fly.
Windows Server 2003—
This level allows only Windows Server 2003, Windows Server 2008, and
Windows Server 2008 R2 domain controllers. It provides all the features
of the Windows 2000 Native domain level, plus additional security and
functionality features, such as domain rename, logon time stamp updates,
and selective authentication.
Windows Server 2008—
The Windows Server 2008 functional level allows only Windows Server
2008 and Windows Server 2008 R2 domain controllers. This level supports
all the features of the Windows Server 2003 functional level plus
additional features such as AES 128 and AES 256 encryption support for
Kerberos, last interactive logon information to provide visibility into
true logon activity by the user, fine-grained password policies to allow
policies to be set on a per-group and per-user basis, and uses DFSR for
Active Directory replication.
Windows Server 2008 R2—
The Windows Server 2008 R2 functional level adds Authentication
Mechanism Assurance. This essentially inserts the type of logon method
into the Kerberos token and allows applications to determine
authorization or access based on the logon method. For example, an
application could only allow logon type 2 (interactive) and not type 3
(network) to ensure that the user was actually at a workstation.
The most important note is that
all of the domain functional levels supported by Windows Server 2008 R2
allow universal security groups.
Creating AD Groups
Now that you understand
what kinds of groups you can create and what they can be used for, you
are ready to create a group. To do so, follow these steps:
1. | Launch Server Manager on a domain controller.
|
2. | Expand the Roles folder.
|
3. | Expand the Active Directory Domain Services folder.
|
4. | Expand the Active Directory Users and Computers snap-in.
|
5. | Expand the domain folder (in this example, the companyabc.com folder).
|
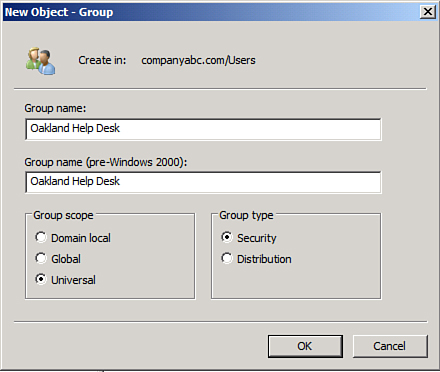
6. | Select a container—for example, the Users container. Right-click it and select New, Group.
|
7. | Enter the group name and select the appropriate group type and scope, as shown in Figure 1.
|
8. | Click OK to finish creating the group.
|
Populating Groups
After
you create a group, you can add members to it. The domain level that
the domain is running in determines whether this group can have other
groups as members.
To add members to an existing group, follow these steps:
1. | Launch Server Manager on a domain controller.
|
2. | Expand the Roles folder.
|
3. | Expand the Active Directory Domain Services folder.
|
4. | Expand the Active Directory Users and Computers snap-in.
|
5. | Expand the domain folder (in this example, the companyabc.com folder).
|
6. | Select
the Users container that was used in the previous section. In the right
pane, right-click the group that was created earlier, and select
Properties.
|
7. | Enter a description for the group on the General tab and then click the Members tab.
|
8. | Click Add to add members to the group.
|
9. | In
the Select Users, Contacts, Computers, or Groups window, type in the
name of each group member separated by a semicolon and click OK to add
these users to the group. If you don’t know the names, clicking the
Advanced button opens a window where you can perform a search to locate
the desired members.
|
10. | When all the members are listed on the Members tab of the group’s property page, click OK to complete the operation.
|
Group Management
After a group is created, it
needs to be managed by an administrator, users, or a combination of
both, depending on the dynamics of the group.
To delegate control of a group to a particular user, follow these steps:
1. | Launch Server Manager on a domain controller.
|
2. | Expand the Roles folder.
|
3. | Expand the Active Directory Domain Services folder.
|
4. | Select Active Directory Users and Computers and select Advanced Features from the View menu.
|
5. | Expand the Active Directory Users and Computers snap-in.
|
6. | Expand the domain folder (in this example, the companyabc.com folder).
|
7. | Select
the Users container that was used in the previous section. In the right
pane, right-click the group that was created earlier, and select
Properties.
|
8. | Select the Security tab.
|
9. | At the bottom of the page, click the Advanced button.
|
10. | In the Advanced Security Settings for Group dialog box, select the Permissions tab.
|
11. | Click
Add. In the Select User, Computer, or Group window, type in the name of
the account for which you want to grant permissions, and click OK.
|
12. | When the Permissions Entry for Group window appears, select the Properties tab.
|
13. | Click the Apply To drop-down list arrow, and then select This Object Only.
|
14. | In the Permissions section, check the Allow boxes for Read Members and Write Members, as shown in Figure 2. Then click OK.

|
15. | Click OK to close the Advanced Security Settings for Group dialog box.
|
16. | Click OK to close the group’s property pages.
|
