Logo
HOW TO
Windows XP
Windows Vista
Windows 7
Windows Azure
Windows Server
Windows Phone
 
 
Windows 7

Microsoft OneNote 2010 : Using the Research and Translate Tools (part 2) - Translating a Word or Phrase with the Research Pane

6/19/2014 9:08:51 PM

Translating a Word or Phrase with the Research Pane

Whether you’re reviewing documents and notes from your company’s foreign subsidiaries, or you work with an exchange student at your school, there might be times when you want a quick text translation when working in OneNote.

To translate a single word or short phrase in your notes, do the following:
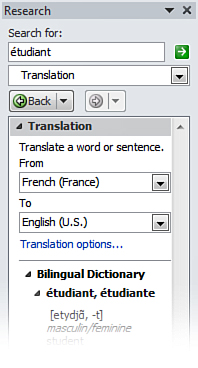
1.
Select the foreign word or phrase in your notes, right-click the selection, and then click Translate. The Research pane opens, this time with Translation set as the default search engine.

2.
If necessary, select the appropriate languages in the From and To boxes under Translation. For example, if you’ve selected the word étudiant in your notes, you could select French in the From box and English in the To box (see Figure 3).

Figure 3. When using the Research task pane for language translation, you can choose the language from which to translate and the language into which to translate the selected text.


3.
Click the green Start Searching arrow at the top of the task pane and then look for the translated result in the results list.

If you frequently translate text in your notes in this way, you might want to set specific translation options to exclude languages that you’ll never use. To do this, click the blue Translation Options link that appears under the Translation heading in the Research task pane, and then select your choices there.


If using the Research task pane for on-the-fly translations isn’t quick enough for you, you can opt to use OneNote’s built-in Mini Translator instead. This built-in translation engine lets you rest the mouse pointer over foreign words in your notes and translate on the fly. Using the Mini Translator, you can also play back certain text to hear its pronunciation.

Setting Your Preferred Mini Translator Language

Before you can use the Mini Translator, you must first set the language into which you want to translate selected text in OneNote.

To set your preferred Mini Translator language, do the following:

1.
On the OneNote ribbon, click Review, and then, in the Language group, click the small downward-facing arrow at the bottom of the Translate button.

2.
On the pop-up menu that appears, click Choose Translation Language.

3.
In the Translation Language Options dialog box that appears, click the Translate to drop-down list and then select French (France) or any other language that you prefer.

4.
Click OK.

Once your preferred translation language is set, you can start using the Mini Translator.

Other -----------------
- Microsoft OneNote 2010 : Doing Research with Linked Notes (part 2) - Ending a Linked Notes Session, Viewing Linked Notes
- Microsoft OneNote 2010 : Doing Research with Linked Notes (part 1) - Beginning a Linked Notes Session
- Microsoft OneNote 2010 : Doing Research with Side Notes (part 3) - Moving Side Notes to Your Existing Notes
- Microsoft OneNote 2010 : Doing Research with Side Notes (part 2) - Reviewing Side Notes
- Microsoft OneNote 2010 : Doing Research with Side Notes (part 1) - Creating Side Notes
- Games and Windows 7 : Installing and Playing Third-Party Games
- Games and Windows 7 : Using the Games Explorer (part 4) - Managing Your Game Controllers and Other Game-Related Hardware
- Games and Windows 7 : Using the Games Explorer (part 3) - Rating Your System's Performance
- Games and Windows 7 : Using the Games Explorer (part 2) - Customizing Games Explorer
- Games and Windows 7 : Using the Games Explorer (part 1)
 
 
REVIEW
- First look: Apple Watch

- 10 Amazing Tools You Should Be Using with Dropbox

- 3 Tips for Maintaining Your Cell Phone Battery (part 1)

- 3 Tips for Maintaining Your Cell Phone Battery (part 2)
 
VIDEO TUTORIAL
- How to create your first Swimlane Diagram or Cross-Functional Flowchart Diagram by using Microsoft Visio 2010 (Part 1)

- How to create your first Swimlane Diagram or Cross-Functional Flowchart Diagram by using Microsoft Visio 2010 (Part 2)

- How to create your first Swimlane Diagram or Cross-Functional Flowchart Diagram by using Microsoft Visio 2010 (Part 3)
 
Popular tags
Microsoft Access Microsoft Excel Microsoft OneNote Microsoft PowerPoint Microsoft Project Microsoft Visio Microsoft Word Active Directory Biztalk Exchange Server Microsoft LynC Server Microsoft Dynamic Sharepoint Sql Server Windows Server 2008 Windows Server 2012 Windows 7 Windows 8 Adobe Indesign Adobe Flash Professional Dreamweaver Adobe Illustrator Adobe After Effects Adobe Photoshop Adobe Fireworks Adobe Flash Catalyst Corel Painter X CorelDRAW X5 CorelDraw 10 QuarkXPress 8 windows Phone 7 windows Phone 8 BlackBerry Android Ipad Iphone iOS
Popular keywords
HOW TO Swimlane in Visio Visio sort key Pen and Touch Creating groups in Windows Server Raid in Windows Server Exchange 2010 maintenance Exchange server mail enabled groups Debugging Tools Collaborating
Top 10
- Microsoft Excel : How to Use the VLookUp Function
- Fix and Tweak Graphics and Video (part 3) : How to Fix : My Screen Is Sluggish - Adjust Hardware Acceleration
- Fix and Tweak Graphics and Video (part 2) : How to Fix : Text on My Screen Is Too Small
- Fix and Tweak Graphics and Video (part 1) : How to Fix : Adjust the Resolution
- Windows Phone 8 Apps : Camera (part 4) - Adjusting Video Settings, Using the Video Light
- Windows Phone 8 Apps : Camera (part 3) - Using the Front Camera, Activating Video Mode
- Windows Phone 8 Apps : Camera (part 2) - Controlling the Camera’s Flash, Changing the Camera’s Behavior with Lenses
- Windows Phone 8 Apps : Camera (part 1) - Adjusting Photo Settings
- MDT's Client Wizard : Package Properties
- MDT's Client Wizard : Driver Properties
 
Windows XP
Windows Vista
Windows 7
Windows Azure
Windows Server
Windows Phone
2015 Camaro