Logo
HOW TO
Windows XP
Windows Vista
Windows 7
Windows Azure
Windows Server
Windows Phone
 
 
Windows 7

Using the Windows 7 Libraries : USING THE EXPLORER BROWSER CONTROL (part 1) - Adding the Explorer Browser to Your Toolbox , Configuring the Explorer Browser Example

7/30/2014 9:02:38 PM

Explorer Browser is another in a long line of controls that Microsoft has provided for making it easier to create interesting applications using less code. As the name implies, it's a browser-like control that you can place on a form and use to explore various resources, including any known folder, non-filesystem container, or user-defined collection. You could also use it to explore the filesystem, the Internet, or any other resource desired. As you might imagine, the actual presentation you see depends on the kind of resource you explore and the presentation you choose to code as part of the control. The following sections describe how to work with the Explorer Browser control.

1. Adding the Explorer Browser to Your Toolbox

Before you can use the Explorer Browser control in an application, you need to add it to your Toolbox. The following steps help you get the Explorer Browser control set up for use with the example application. You can then use it for any application you want to create.

  1. Open the Toolbox by choosing View Toolbox or by pressing Ctrl+Alt+X.

  2. Right-click in any clear area of the Toolbox and choose Add Tab from the Context menu. You'll see a new tab added to the Toolbox.

  3. Type Explorer Browser as the tab's name.

  4. Right-click within the Explorer Browser tab and select Choose Items from the Context menu. You'll see the Choose Toolbox Items dialog box, as shown in Figure 1.

  5. Click Browse. You'll see an Open dialog box.

  6. Locate the Microsoft.WindowsAPICodePack.Shell.DLL file and click Open. Visual Studio automatically selects and highlights two controls for you, CommandLink and ExplorerBrowser, in the Choose Toolbox Items dialog box.

  7. Click OK. You'll see the two controls added to the Explorer Browser tab of the Toolbox, as shown in Figure 2.

    Figure 1. Use this dialog box to add the Explorer Browser control.
    Figure 2. The two controls related to the Explorer Browser appear in the Toolbox.

2. Configuring the Explorer Browser Example

This example begins with a Windows Forms application. You'll want a larger form, so set the Size.Width property to 700 and Size.Height property to 500. The setup for this example is a little more extensive than for other examples so far. Begin by adding a SplitContainer control. You won't need to rename it. However, set the following properties to make the SplitContainer control provide the containers required for the example:

  • Dock: Fill

  • IsSplitterFixed: True

  • Orientation: Horizontal

  • SplitterDistance: 21

Add a ComboBox control, lstFolders, to the upper split container. Set its Sorted property to True and its Dock property to Fill. Add an ExplorerBrowser control, Browser, to the lower split container and set its Dock property to Fill. Your dialog box should look like the one shown in Figure 3.
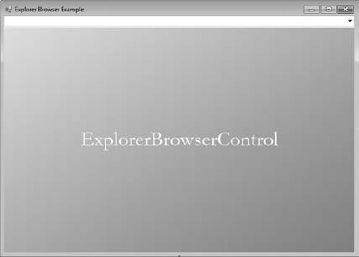
Figure 3. The example requires a little more configuration than normal.

Adding the ExplorerBrowser control automatically adds the required references to your application. However, you do need to provide the following using statement:

using Microsoft.WindowsAPICodePack.Shell;

Other -----------------
- Using the Windows 7 Libraries : CONSIDERING USER-DEFINED COLLECTIONS
- Using the Windows 7 Libraries : USING NON-FILESYSTEM CONTAINERS
- Using the Windows 7 Libraries : WORKING WITH KNOWN FOLDERS
- Conducting Research in OneNote 2010 : Translating Text
- Conducting Research in OneNote 2010 : Researching a Topic, Customizing the Research Task Pane
- Conducting Research in OneNote 2010 : Handling the Research Task Pane
- Microsoft Excel 2010 : Protecting and Securing a Workbook - Setting Macro Security Options
- Microsoft Excel 2010 : Protecting and Securing a Workbook - Setting ActiveX Security Options
- Microsoft Excel 2010 : Protecting and Securing a Workbook - Setting Add-in Security Options
- Microsoft Excel 2010 : Protecting and Securing a Workbook - Setting Document Related Security Options
 
 
REVIEW
- First look: Apple Watch

- 10 Amazing Tools You Should Be Using with Dropbox

- 3 Tips for Maintaining Your Cell Phone Battery (part 1)

- 3 Tips for Maintaining Your Cell Phone Battery (part 2)
 
VIDEO TUTORIAL
- How to create your first Swimlane Diagram or Cross-Functional Flowchart Diagram by using Microsoft Visio 2010 (Part 1)

- How to create your first Swimlane Diagram or Cross-Functional Flowchart Diagram by using Microsoft Visio 2010 (Part 2)

- How to create your first Swimlane Diagram or Cross-Functional Flowchart Diagram by using Microsoft Visio 2010 (Part 3)
 
Popular tags
Microsoft Access Microsoft Excel Microsoft OneNote Microsoft PowerPoint Microsoft Project Microsoft Visio Microsoft Word Active Directory Biztalk Exchange Server Microsoft LynC Server Microsoft Dynamic Sharepoint Sql Server Windows Server 2008 Windows Server 2012 Windows 7 Windows 8 Adobe Indesign Adobe Flash Professional Dreamweaver Adobe Illustrator Adobe After Effects Adobe Photoshop Adobe Fireworks Adobe Flash Catalyst Corel Painter X CorelDRAW X5 CorelDraw 10 QuarkXPress 8 windows Phone 7 windows Phone 8 BlackBerry Android Ipad Iphone iOS
Popular keywords
HOW TO Swimlane in Visio Visio sort key Pen and Touch Creating groups in Windows Server Raid in Windows Server Exchange 2010 maintenance Exchange server mail enabled groups Debugging Tools Collaborating
Top 10
- Microsoft Excel : How to Use the VLookUp Function
- Fix and Tweak Graphics and Video (part 3) : How to Fix : My Screen Is Sluggish - Adjust Hardware Acceleration
- Fix and Tweak Graphics and Video (part 2) : How to Fix : Text on My Screen Is Too Small
- Fix and Tweak Graphics and Video (part 1) : How to Fix : Adjust the Resolution
- Windows Phone 8 Apps : Camera (part 4) - Adjusting Video Settings, Using the Video Light
- Windows Phone 8 Apps : Camera (part 3) - Using the Front Camera, Activating Video Mode
- Windows Phone 8 Apps : Camera (part 2) - Controlling the Camera’s Flash, Changing the Camera’s Behavior with Lenses
- Windows Phone 8 Apps : Camera (part 1) - Adjusting Photo Settings
- MDT's Client Wizard : Package Properties
- MDT's Client Wizard : Driver Properties
 
Windows XP
Windows Vista
Windows 7
Windows Azure
Windows Server
Windows Phone
2015 Camaro