Logo
HOW TO
Windows XP
Windows Vista
Windows 7
Windows Azure
Windows Server
Windows Phone
 
 
Windows 7

Microsoft Project 2010 : Creating a Budget for Your Project (part 2) - Adding Values to Budget Resources, Pairing Resources with Budgets

8/12/2014 4:18:12 AM

Adding Values to Budget Resources

Right now, you have placeholders in your project for each budget in your organization, but we haven’t identified values for those budgets. For example, if you added a resource called “Budget-Training,” you’ve basically said that yes, there is a training budget, but you haven’t said how much money there is in that budget. This is the next step in budgeting your project using Project 2010.

Follow these steps to provide values for your budget resources:

1.
On the View tab, in Resource Views group, click Resource Usage.

2.
Click the arrow on the right side of the Add New Column header and then click Budget Cost.

3.
Click the arrow on the right side of the Add New Column header and then click Budget Work.
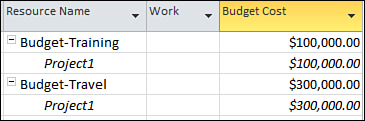
4.
Scroll down in the left portion of the Resource Usage view to display the budget resources for your project. If your budget is measured as a cost, type the cost value for the budget in the Budget Cost column, as shown in Figure 4. If your budget is measured as an amount of work, type the work amount in the Budget Work column.

Figure 4. These two budgets have assigned budget costs.


Pairing Resources with Budgets

Now that you have your budgets defined for your organization, you can choose to go through each work, material, and cost resource in your project and give each a budget assignment. This step is not necessary for using budget resources, but it enables you to easily compare budgeted values against actual values as your project progresses. This comparison lets you see whether you’re overspending, on track, or under-spending.

To match resources with budgets, follow these steps:

1.
On the View tab, in Resource Views group, click Resource Sheet.

2.
On the Format tab, in the Columns group, click Custom Fields.
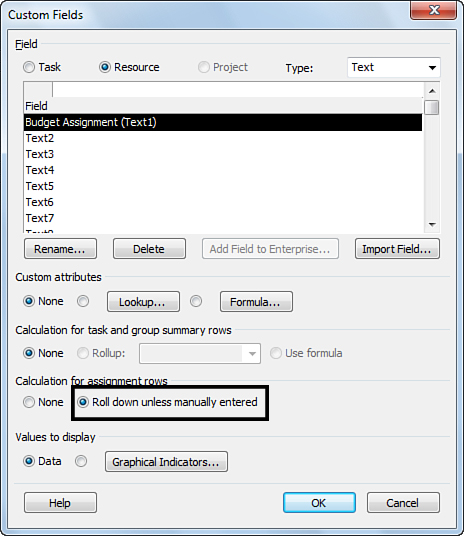
3.
Make sure that the Resource option is selected at the top of the Custom Fields dialog box, choose Text from the Type list, and then click Text1 to select it.

4.
Click Rename, type Budget Assignment in the New name for ‘Text1’ box, and then click OK.

5.
Under Calculation for assignment rows, select Roll down unless manually entered, as shown in Figure 5.

Figure 5. Select the Roll down unless manually entered option.


6.
Click OK to finish defining the Budget Assignment custom field.

7.
In the Resource Sheet view, click the arrow on the right side of the Add New Column header, and then click Budget Assignment (Text1).


It may help to move the Budget Assignment column closer to the Resource Name column, so you can see easily which resources you’re assigning to which budgets. To move the column after you add it, click the Budget Assignment column header once to select it. Now, when you hover over the column header, you see a four-way arrow. Click and drag the column header across the view to a spot closer to the Resource Name column.


8.
In the Budget Assignment column for each resource in the Resource Sheet view, type the name of the budget to which you want the resource’s actual values to be attributed. For example, if one of the resources in your project is a travel coordinator, you may want to attribute all costs that the travel coordinator incurs on your project to the Travel budget. Be sure to type values in the Budget Assignment column for each budget resource, as well.

Be sure to consistently type budget names in the Budget Assignment column. That is, be sure you use the same capitalization, spelling, spacing, and punctuation. This helps easily group resources later, when you want to compare actual values with budgeted values.

Other -----------------
- Microsoft Access 2010 : Enhancing the Queries That You Build - Ordering Query Results, Refining a Query by Using Criteria
- Microsoft Access 2010 : Enhancing the Queries That You Build - Everything You Need to Know About Query Basics
- Using the Windows 7 Libraries : USING THE EXPLORER BROWSER CONTROL (part 2)
- Using the Windows 7 Libraries : USING THE EXPLORER BROWSER CONTROL (part 1) - Adding the Explorer Browser to Your Toolbox , Configuring the Explorer Browser Example
- Using the Windows 7 Libraries : CONSIDERING USER-DEFINED COLLECTIONS
- Using the Windows 7 Libraries : USING NON-FILESYSTEM CONTAINERS
- Using the Windows 7 Libraries : WORKING WITH KNOWN FOLDERS
- Conducting Research in OneNote 2010 : Translating Text
- Conducting Research in OneNote 2010 : Researching a Topic, Customizing the Research Task Pane
- Conducting Research in OneNote 2010 : Handling the Research Task Pane
 
 
REVIEW
- First look: Apple Watch

- 10 Amazing Tools You Should Be Using with Dropbox

- 3 Tips for Maintaining Your Cell Phone Battery (part 1)

- 3 Tips for Maintaining Your Cell Phone Battery (part 2)
 
VIDEO TUTORIAL
- How to create your first Swimlane Diagram or Cross-Functional Flowchart Diagram by using Microsoft Visio 2010 (Part 1)

- How to create your first Swimlane Diagram or Cross-Functional Flowchart Diagram by using Microsoft Visio 2010 (Part 2)

- How to create your first Swimlane Diagram or Cross-Functional Flowchart Diagram by using Microsoft Visio 2010 (Part 3)
 
Popular tags
Microsoft Access Microsoft Excel Microsoft OneNote Microsoft PowerPoint Microsoft Project Microsoft Visio Microsoft Word Active Directory Biztalk Exchange Server Microsoft LynC Server Microsoft Dynamic Sharepoint Sql Server Windows Server 2008 Windows Server 2012 Windows 7 Windows 8 Adobe Indesign Adobe Flash Professional Dreamweaver Adobe Illustrator Adobe After Effects Adobe Photoshop Adobe Fireworks Adobe Flash Catalyst Corel Painter X CorelDRAW X5 CorelDraw 10 QuarkXPress 8 windows Phone 7 windows Phone 8 BlackBerry Android Ipad Iphone iOS
Popular keywords
HOW TO Swimlane in Visio Visio sort key Pen and Touch Creating groups in Windows Server Raid in Windows Server Exchange 2010 maintenance Exchange server mail enabled groups Debugging Tools Collaborating
Top 10
- Microsoft Excel : How to Use the VLookUp Function
- Fix and Tweak Graphics and Video (part 3) : How to Fix : My Screen Is Sluggish - Adjust Hardware Acceleration
- Fix and Tweak Graphics and Video (part 2) : How to Fix : Text on My Screen Is Too Small
- Fix and Tweak Graphics and Video (part 1) : How to Fix : Adjust the Resolution
- Windows Phone 8 Apps : Camera (part 4) - Adjusting Video Settings, Using the Video Light
- Windows Phone 8 Apps : Camera (part 3) - Using the Front Camera, Activating Video Mode
- Windows Phone 8 Apps : Camera (part 2) - Controlling the Camera’s Flash, Changing the Camera’s Behavior with Lenses
- Windows Phone 8 Apps : Camera (part 1) - Adjusting Photo Settings
- MDT's Client Wizard : Package Properties
- MDT's Client Wizard : Driver Properties
 
Windows XP
Windows Vista
Windows 7
Windows Azure
Windows Server
Windows Phone
2015 Camaro