Logo
programming4us
programming4us
programming4us
programming4us
Home
programming4us
XP
programming4us
Windows Vista
programming4us
Windows 7
programming4us
Windows Azure
programming4us
Windows Server
programming4us
Windows Phone
 
Windows Server

Windows Server 2008 R2 high-availability and recovery features : Installing and Administering Network Load Balancing (part 2) - Creating a Network Load Balancing cluster

- How To Install Windows Server 2012 On VirtualBox
- How To Bypass Torrent Connection Blocking By Your ISP
- How To Install Actual Facebook App On Kindle Fire
4/27/2014 2:33:12 AM

Creating a Network Load Balancing cluster

After installing the NLB feature on each server that will become a cluster node, you are ready to create a new cluster. Perform the following to create a new NLB cluster:

1.
Open the Network Load Balancing Manager from Start | All Programs | Administrative Tools | Network Load Balancing Manager.

2.
Right click Network Load Balancing Clusters and select Create New Cluster (see Figure 3).

Figure 3. Network Load Balancing Manager.

3.
Enter the hostname of the cluster node you wish to configure. Then click Connect (see Figure 4).

Figure 4. Connect to Cluster Host.


4.
Select the interface that you want to use for the NLB cluster. Remember that this has to be a dedicated network adapter if you plan on using unicast mode. Select the interface you want to use, and then click Next.

5.
Select the IP address that you want to dedicate for cluster traffic. You also need to select the host priority (see Figure 5). The lower numbered node is the first to receive traffic. Then click Next.

Figure 5. Host Parameters.


6.
Enter the cluster VIP address (see Figure 6). This is the address that clients will use to connect to the cluster. This IP will be shared among all nodes of the cluster. Then click Next.

Figure 6. Cluster Virtual IP (VIP) Address.


7.
You now need to configure the cluster operation mode (see Figure 7). You can use one of the following modes:

  • Unicast

  • Multicast

  • IGMP Multicast

Figure 7. Configuring the Cluster operation mode.


In addition to selecting the cluster operation mode, you can optionally enter a FQDN that will be used to refer to the cluster IP. Click Next to continue.

8.
You now need to configure the NLB ports range, protocols, and filtering mode (see Figure 8):

  • Ports Range —This is the range of ports that will be load balanced. You should limit this range to the ports used by the application being load balanced. For example, if you are load balancing an IIS Web site, you will more than likely want to use ports 80 and 443.

  • Protocols —Similar to port range, you need to select the protocols (TCP or UDP) used by the application being load balanced.

  • Filtering Mode —Filtering mode is used to help configure “stickyness.” Many applications may require that once a session is initiated to a host the client must continue to use the same host to complete certain transactions. For example, an ecommerce site could host a checkout process. The application may require that you remain on the same host to perform the checkout. To help ensure that this session “sticks” to the same host, you can use filtering. By choosing Multiple host and setting affinity to single, NLB will ensure that as long as the client comes from the same IP address, it will remain on the same node for the duration of the session. By setting affinity to Network, NLB will ensure that the client’s network, subnetted to a class C, will continue the session on the same host. This is useful if the clients are NAT’d behind firewall with multiple public IP addresses.

Figure 8. Configuring the NLB Ports range, Protocols, and Filtering mode.


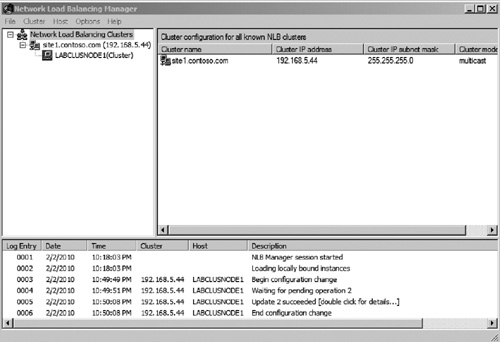
After configuring port rules and filtering, click Finish to complete the setup of the NLB cluster. You will see several configuration steps taking place in the Network Load Balancer Manager. When the configuration is complete, you should see a newly set up NLB cluster similar to Figure 9.

Figure 9. Network Load Balancing Cluster.

Adding an additional node to the NLB cluster

After initial setup, you will need to add the rest of the nodes to the cluster. To add additional nodes, perform the following within Network Load Balancer Manager:

1.
Right click the cluster and select the option to Add Host to Cluster.

2.
Enter the server name of the host you wish to add as a node and click Connect.

3.
Select the interface you wish to use for the cluster, and then click Next.

4.
Select the priority of the new node, and then select the IP address to be used for cluster traffic. Then click Next.

5.
Verify that the port and affinity configuration matches that of the other node. These options should be grayed out. Then click Finish.

The Network Load Balancer Manger should perform a few configuration steps and then add the second node to the cluster.

You can now test the cluster by accessing the NLB cluster IP address. If you want to verify NLB functionality and that failover is working properly, you can shut down one of the nodes. You should still be able to access the application or Web site on the cluster IP address.

Other -----------------
- Windows Server 2008 R2 high-availability and recovery features : Installing and Administering Failover Clustering (part 8) - Administering a Failover Cluster
- Windows Server 2008 R2 high-availability and recovery features : Installing and Administering Failover Clustering (part 7) - Create shared folder on cluster, Testing Failover of Cluster
- Windows Server 2008 R2 high-availability and recovery features : Installing and Administering Failover Clustering (part 6) - Add primary storage to cluster, Configure service or application
- Windows Server 2008 R2 high-availability and recovery features : Installing and Administering Failover Clustering (part 5) - Creating a new Failover Cluster
- Windows Server 2008 R2 high-availability and recovery features : Installing and Administering Failover Clustering (part 4) - Verifying cluster configuration using the Cluster Validation Wizard
- Windows Server 2008 R2 high-availability and recovery features : Installing and Administering Failover Clustering (part 3) - Connecting cluster nodes to shared storage
- Windows Server 2008 R2 high-availability and recovery features : Installing and Administering Failover Clustering (part 2) - Adding Failover Clustering feature
- Windows Server 2008 R2 high-availability and recovery features : Installing and Administering Failover Clustering (part 1) - Failover Clustering prerequisites
- Microsoft Exchange Server 2007 : Installing the Client Access Server - Installing the Client Access Server Role
- Microsoft Exchange Server 2007 : Understanding the Client Access Server (part 4) - Availability Service, POP and IMAP
 
 
Top 10
- Microsoft Visio 2013 : Adding Structure to Your Diagrams - Finding containers and lists in Visio (part 2) - Wireframes,Legends
- Microsoft Visio 2013 : Adding Structure to Your Diagrams - Finding containers and lists in Visio (part 1) - Swimlanes
- Microsoft Visio 2013 : Adding Structure to Your Diagrams - Formatting and sizing lists
- Microsoft Visio 2013 : Adding Structure to Your Diagrams - Adding shapes to lists
- Microsoft Visio 2013 : Adding Structure to Your Diagrams - Sizing containers
- Microsoft Access 2010 : Control Properties and Why to Use Them (part 3) - The Other Properties of a Control
- Microsoft Access 2010 : Control Properties and Why to Use Them (part 2) - The Data Properties of a Control
- Microsoft Access 2010 : Control Properties and Why to Use Them (part 1) - The Format Properties of a Control
- Microsoft Access 2010 : Form Properties and Why Should You Use Them - Working with the Properties Window
- Microsoft Visio 2013 : Using the Organization Chart Wizard with new data
- First look: Apple Watch

- 3 Tips for Maintaining Your Cell Phone Battery (part 1)

- 3 Tips for Maintaining Your Cell Phone Battery (part 2)
programming4us programming4us
Popular tags
Microsoft Access Microsoft Excel Microsoft OneNote Microsoft PowerPoint Microsoft Project Microsoft Visio Microsoft Word Active Directory Biztalk Exchange Server Microsoft LynC Server Microsoft Dynamic Sharepoint Sql Server Windows Server 2008 Windows Server 2012 Windows 7 Windows 8 windows Phone 7 windows Phone 8
programming4us programming4us
 
programming4us
Natural Miscarriage
programming4us
Windows Vista
programming4us
Windows 7
programming4us
Windows Azure
programming4us
Windows Server
programming4us
Game Trailer