Administering a Failover Cluster
After
you set up a new cluster, you will need to make sure that you are
familiar with the management interface and understand how to perform
basic cluster administration tasks. You also need to have an
understanding of how to monitor the health of your cluster as well as
how to perform regular maintenance. Each cluster has four primary areas
for administration and monitoring:
Services and applications
This section is used to manage the application or
service supported by the cluster. For example, this node can be used to
create new shared folders on a file server cluster. You can also use
the Services and Applications node to manually failover the cluster in
the event that you want to test failover capabilities or perform
maintenance on the primary node. Additionally, the Services and
Applications node allows you to run a dependency report which will
graphically display all dependencies in the cluster as seen in Figure 31.

|
Applying updates and patching cluster nodes
As best practice, you should apply service packs and
updates to a passive node of the cluster first. After applying the
updates, move the cluster to the passive node, and then apply updates
to the nodes that were previously active.
|
Nodes
The
Nodes section allows you to manage existing cluster nodes as well as
add new ones. By adding new nodes, you can provide additional
availability to the cluster; however, if you change the number of
nodes, you may need to change the quorum setting. You can also use the
Nodes section to evict nodes form the cluster. In the event that a node
fails, you may need to use the evict option to remove it from the
cluster.
Storage
The Storage section is used to add and remove
storage to and from the cluster. If new disks are configured, they
should be added to the cluster, using the Add Disk option. You can also
use the Storage section to simulate a failure of the quorum disk. This
is helpful in testing what types of failures your cluster can tolerate,
without going offline.
|
Cluster shared volumes for Hyper-V
If you are using the cluster to host Hyper-V virtual
machines, and you want to provide Live Migration services, you will
need to enable CSV by right clicking on the cluster node and selecting
the option to Enable Cluster Shared Volumes. You should only select this option if the cluster will be supporting Hyper-V fail-over and Live Migration.
|
Networks
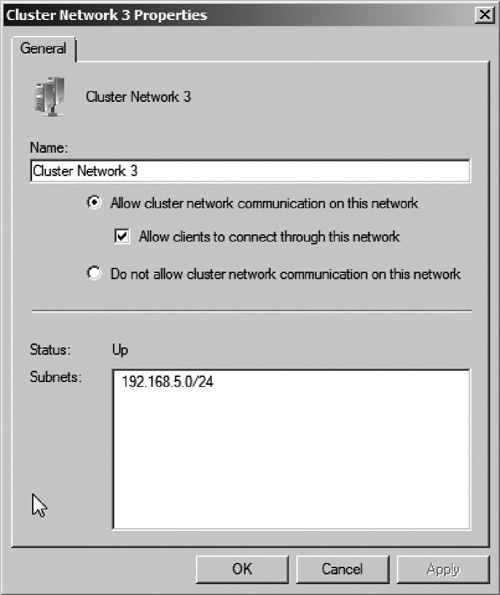
The Networks section allows you to administer the
network settings for the cluster. These settings include specifying
which networks can be used for cluster communications and which can be
used for client connectivity (see Figure 32). For example, you may want to ensure that the cluster cannot perform node-to-node communications through the iSCSI network.

Cluster Events
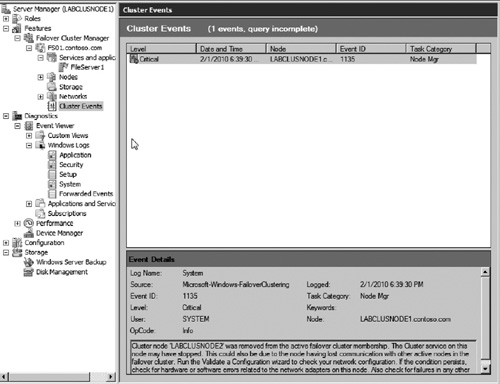
The Cluster Events section can be used to monitor
Windows events related to the failover cluster. This includes
configuration warnings and critical errors such as failover events (see
Figure 33). These events should be reviewed on a regular basis either manually or by monitoring tools such as
Microsoft System Center Operations Manager 2007. Error events in this
log typically represent a degradation in the health of the cluster.

Using PowerShell to manage Failover Clusters
You can use PowerShell to perform many common
administrative tasks for Failover Clusters. This provides an easy way
to manage a cluster from the command line and also to automate tasks
using scripts. It is recommended that you use PowerShell over the
cluster.exe command line tool as cluster.exe is being deemphasized and
may not be available in future versions of Windows. Let us take a look
at a couple of PowerShell commands that can be used to help manage a
cluster.
Move-ClusterGroup—This command can be used to manually fail the cluster over to a passive node. For example:
Move-ClusterGroup –name FileServer1 will manually move the file server to any available passive node.
You could also issue the command Move-ClusterGroup –name FileServer1 –node ClusNode2
to specify which passive node to fail the cluster over to. This command
could be helpful if you have an automatically schedule patch install
for clustered servers. You could create a PowerShell script that will
manually failover the cluster and schedule it to run after the passive
node has been patched.
Test-Cluster—This
command can be used to run the validation wizard from the command line.
This command can be used to regularly automate running the validation
test. For example, you could create a PowerShell script that issues the
following command:
Test-Cluster –ReportName Z:\ClusterValidationReport.mht.
This would run the validation wizard and save the report on the Z:
drive which could easily be a shared folder on a network server.