Directory Security Tab
The Directory Security
tab allows you to specify whether anonymous users are allowed to access
content in your site, to restrict access to a Web site, and to enable
secure HTTP communication. Let’s take a look.
Anonymous Access and Authentication Control
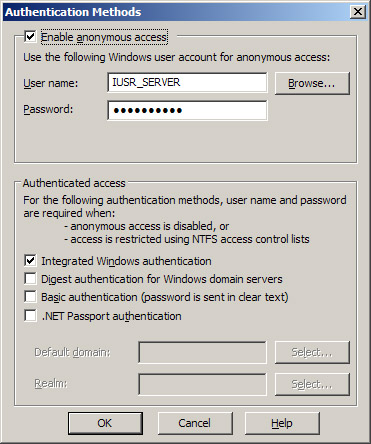
To specify whether
anonymous users are allowed to access content in your site or whether
some form of authentication will be required, open the Authentication
Methods dialog box, shown in Figure 4,
by clicking Edit within the Anonymous Access And Authentication Control
field on the Directory Security tab. Use the dialog box to configure
these settings:
Enable Anonymous Access
This option specifies whether anonymous access is allowed and which
Windows user account is used to provide this kind of access. The default
anonymous user account, created during installation of IIS on the
server, is named IUSR_servername, where servername
is the NetBIOS name of the server. Anonymous access means users can
access content in the site using their Web browsers without needing to
have their credentials authenticated in any way, and it’s the typical
authentication method used for public Web sites on the Internet. The
other forms of authentication discussed next authenticate the user’s
credentials in some fashion and are used primarily for intranets,
extranets, and secure Internet sites.
Integrated Windows Authentication
Here, a cryptographic exchange is used to securely authenticate the
user without actually passing credentials across the connection. The
user isn’t prompted for credentials; instead, his or her currently
logged-on credentials are used. Integrated Windows authentication can
also use Kerberos authentication if the server has Active Directory
installed on it and if the client browser supports it.
Digest Authentication For Windows Domain Servers This authentication method works only with Active Directory accounts. It can work across firewalls and proxy servers.
A hash or message digest is passed across the connection instead of the
user’s actual credentials. The information is transmitted in clear text
but is hashed, so it’s essentially undecodable and secure. The domain
controller for which the authentication request is made requires a
plain-text copy of the user’s password, however, so special precautions
must be taken to secure the domain controller. Note that a Realm must be
defined if you are using digest authentication.
Basic Authentication
This option specifies whether basic authentication is allowed. If used,
the client is presented with a dialog box requesting credentials and
those credentials are then passed over the network connection in
unencrypted form. Basic authentication is defined in the original HTTP 1
specification and is supported by virtually all types of Web browsers,
including the oldest ones. If users accessing your site are using older
browsers that can’t be authenticated using other forms of authenticated
access, you might need to enable basic authentication on your site, but
be aware that it is intrinsically insecure.
.NET Passport Authentication
This uses Microsoft Passport technology to perform authentication. A
default domain must be defined before you can enable this authentication
method.
Note
Integrated
Windows authentication is designed to be used primarily on intranets and
other internal networks because it won’t work through an HTTP proxy
connection. It will, however, work over a Point-to-Point Tunneling
Protocol (PPTP) connection.
Consider
the consequences of selecting more than one method in the
Authentication Methods dialog box. If you select Anonymous Access
together with some form of authenticated access such as basic
authentication, anonymous access is attempted first. If this fails,
authenticated access is tried. Enabling Anonymous Access can fail if the
NTFS permissions on the resource explicitly deny access to the
anonymous user account, for example. If
you select two or more forms of authenticated access, the most secure
forms are attempted first. For example, integrated Windows
authentication is tried before attempting basic authentication. |
|
IP Address and Domain Name Restrictions
The Directory
Security tab also allows you to restrict access to a Web site by giving
clients a particular IP address or DNS domain name. Figure 5 shows the IP Address And Domain Name Restrictions dialog box that you can access from this tab.
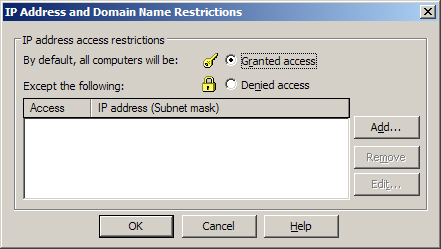
Use this dialog box
either to allow access to the site for all clients except for those
whose IP addresses or domain names are specified here, or to deny all
clients access to the site except for those whose IP addresses or domain
names are specified here. You can place restrictions on clients in
three ways:
Specify the IP address of a particular client.
Specify a network ID and subnet mask representing a range of IP addresses.
Specify the DNS name of a particular domain.
Note
that selecting the last option can significantly affect server
performance because reverse DNS lookups must be performed on all clients
prior to granting them access. For information about how IP address and
domain name restrictions fit into the general scheme of IIS security.
Secure Communications
The Directory
Security tab also allows you to enable secure HTTP communications by
implementing the SSL 3 protocol, which you can use to encrypt Web
traffic between client and server. SSL is essential if you plan to use
your server for running Web applications that involve financial
transactions or hosting sensitive information. Web browsers access a
secure server using SSL by using URLs that are prefixed by https:// instead of the usual http:// prefix.
SSL is based on
public-key cryptography, in which digital certificates are used to
establish the identity and trustworthiness of servers (and of clients),
while a public/private key pair is used for encrypting and decrypting
transmissions to ensure that the information being transmitted is secure
and has integrity (in other words, that it’s from who it says it’s
from).
Before
attempting to implement secure communications, you must establish access
to a certificate authority (CA) that can grant the IIS server the
necessary server certificate and public/private key pair. For this
purpose, you have the following choices:
Use a trusted
public CA—such as VeriSign, Inc.—to obtain the certificate and key
pair. This solution is good if you want to enable secure communications
for a public Internet site you are hosting on your server.
Install
Certificate Services on one or more Windows servers in your enterprise
and be your own CA. This solution is best if you want to enable secure
communications to a private intranet site you are hosting on your
server.
To enable SSL, you
first need to generate a certificate request file and submit this to a
CA in order to receive a server certificate from the CA. The server
certificate contains the associated public key and is used for verifying
the identity of the server and establishing secure connections.
To obtain a server
certificate, follow the steps outlined next. For this example, the
server certificate is being requested for the Default Web Site on server
server.example.com; this server is also running Certificate Services.
The (clever) name of the CA is Company Root CA.
1. | Click
Server Certificate on the Directory Security tab of the Default Web
Site Properties window. This starts the Web Server Certificate Wizard.
Click Next to dismiss the welcome message and display the available
options. (See Figure 6.)

|
2. | Select Create A New Certificate. Click Next.
|
3. | Select
Prepare The Request Now But Send It Later if you plan to submit a
security request file to a public CA. (Later, you’ll need to install or
bind the certificate you receive from the CA to your server.) Or select
Send The Request Immediately To An Online Certification Authority if you
want to request, obtain, and bind the certificate in one shot by
submitting your request directly to a certificate server in your
enterprise. Click Next.
|
4. | Specify
a friendly name for the certificate (the name Default Web Site is
suggested here by default) and a bit length to indicate the strength of
the encryption key (which can be powers of 2 between 512 and 16384 bits,
inclusive). Click Next.
|
5. | Specify organization and organizational unit names for your certificate. Click Next.
|
6. | Specify
a common name for your site. Use the fully qualified DNS name for the
site if your site is a public one on the Internet. In this example, server.example.com is the common name for the Default Web Site. Click Next.
|
7. | Specify
the city, state, and country. Use official names and not abbreviations
(except for two-letter country codes). Click Next.
|
8. | Type a file name for the certificate request. Click Next.
|
9. | A
summary page is displayed showing you what just happened. You’re using
your own CA here, however, and you don’t need to find another one.
|
10. | In
this example, you generate a file that encapsulates the request.
Because you’re handling the CA on your own server, you have to finish
the process. Open the Certification Authority, submit the new request,
and then issue the certificate. You can then install the certificate.
|
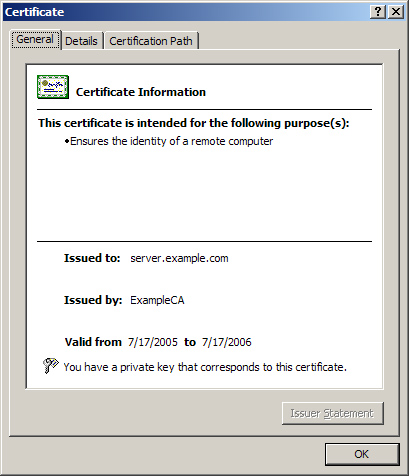
After a server
certificate is installed on your Web site, you can view the certificate
information by clicking View Certificate on the Directory Security tab. Figure 7 shows a certificate installed on the server.
Now finish enabling SSL for the Default Web Site on server.example.com by following these steps:
1. | Switch
to the Web Site tab of the Default Web Site Properties window, and
verify that the SSL port is specified as 443, the default SSL port. (You
can use the Advanced button to configure other SSL identities for the
site if you want.)
|
2. | Switch
back to the Directory Security tab, and click Edit in the Secure
Communications section of the tab. The Secure Communications dialog box
opens. (See Figure 8.)
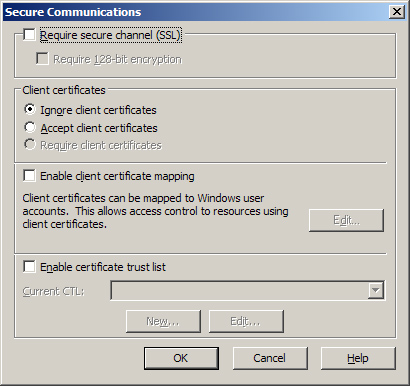
|
3. | Select
the check box Require Secure Channel (SSL), and click OK to finish
configuring SSL for the Default Web Site. (The other options in this
dialog box are discussed in the sidebar “Secure Communications Options.”) Click OK again to apply the changes to your site and implement the new settings.
|
4. | Now test secure communications by using Internet Explorer to open the URL http://server.example.com. Select the Default Web Site node in the console tree of IIS, click Action, and select Browse from the drop-down menu.
|
5. | Internet Explorer starts and tries to access the default home page of http://server.example.com.
The result should be a message displayed that says, “This page must be
viewed over a secure channel.” Choose Open from the File menu and type
the revised URL https://server.example.com.
|
6. | A
dialog box might appear indicating that you are about to view pages
over a secure connection; if it does, click OK. The home page
Default.htm should be displayed.
|
Besides
enabling SSL using the server certificate installed on the IIS system,
you can also use the Secure Communications dialog box in Figure 33-14 for the following purposes: To specify that SSL connections will use strong 128-bit encryption. To
specify how to handle client certificates. Client certificates verify
the identity of clients and are typically used when remote users need to
securely access a corporate intranet over a nonsecure Internet
connection. You can specify either to ignore, accept, or require client
certificates during SSL communications. To
enable client certificate mapping. This feature enables administrators
to create mappings between Windows Server user accounts and client
certificates so that users who have the appropriate client certificate
can automatically be authenticated and logged on to the network. To
enable a certificate trust list (CTL). A CTL is a list of approved CAs
for the Web site that are considered trusted by the Web site. CTLs are
created using the CTL Wizard by clicking New at the bottom of the Secure
Communications dialog box.
|
