Creating Links by Using the Task Information Dialog Box
You can use the Predecessors tab of the Task
Information dialog box to create and edit a selected task’s predecessor
links, no matter what view is active (see Figure 7).
Unlike the Edit, Link Tasks command, the Task Information dialog box
enables you to choose the type of link and to enter the lag or lead
time.

To create a dependency relationship by using the Task Information dialog box, follow these steps:
1. | Select the dependent (the successor) task.
|
2. | Open the Task Information dialog box by clicking the Information button on the Task tab toolbar, or by double-clicking the task.
|
3. | Click
the Predecessors tab. The Predecessors tab features a table in which
you can define predecessors, including the type of link and any lead or
lag time (refer to Figure 7).
|
4. | Activate
the first blank cell under the Task Name field. Choose the name of the
task to be the predecessor task from the drop-down list in the field.
The drop-down lists the names of all tasks in the project. Project
automatically supplies the ID number and the default Finish-to-Start
link type, with no lag, unless you choose otherwise.
Alternatively, if you remember the ID number for the predecessor task,
you can enter it in the cell in the ID column. Press Enter to finish
the cell entry or select the green check button on the Entry bar.
Project automatically supplies the task name for that ID number and
supplies the default Finish-to-Start link type, with no lag.
|
5. | Use the drop-down list in the Type column to change the dependency type, if needed.
|
6. | To
create lag or lead time, click in the Lag field and type the amount of
lag or lead time, followed by a time unit (unless you want to use the
default time unit). Use a negative number to specify a lead time.
|
7. | If additional predecessors exist for the task, repeat steps 4 through 6 as needed for each predecessor.
|
8. | To delete a predecessor, select any cell in its row and press the Delete key.
|
9. | Click OK or press Enter to accept the changes.
|
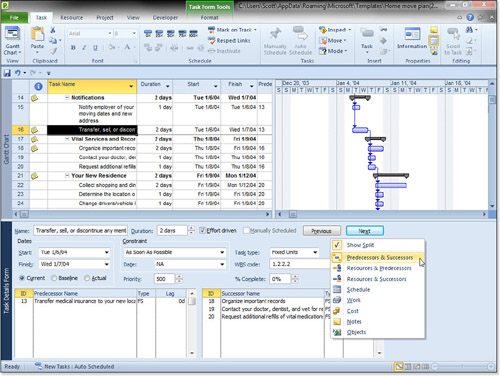
Creating Links by Using the Task Form View
With a task view such as the Gantt Chart view in the
top pane, you can split the window and use the Task Form view in the
bottom pane to define the predecessor and successor relationships (see Figure 8).
To split the window, click the Details button in the Properties group
on the Task tab. This is an easy way to define or edit complex
dependency relationships. Select a task in the top pane and define its
predecessor or successor link in the predecessor or successor details
in the bottom pane.
The default display of task details in the Task Form
view is to show resources and predecessors. If you want to display both
predecessor and successor details, right-click over the Task Form and
choose Predecessors & Successors, as shown in Figure 8.
Or you can activate the Task Form view and select the Format tab.
Because the Format tab is context dependent, functionally this view
serves the same purposes as the Task Information dialog.
If you display the predecessor details, you can define a predecessor for the dependent task by following these steps:
1. | Select the dependent task in the top pane or use the Previous and Next buttons in the lower pane to move to the desired task.
Note If you want to enter the
successor details in the Task Form view, select the predecessor task in
the top pane and use the successor detail fields in the steps that
follow instead of the predecessor fields. The link is defined exactly
the same in either detail area. |
|
2. | In the bottom pane, activate the first cell in either the ID or Predecessor Name column.
|
3. | If
you selected the Predecessor Name field, use the drop-down list of task
names to select the name of the task to be the predecessor. The Task
Form view still shows the OK button because selecting the task name
completes only the cell entry.
You can also type the predecessor’s ID number in the ID field and press
Enter to complete the cell entry. Project automatically fills in the
predecessor name when you click the OK button to complete the linking
definition.
If you do not know the ID number of the predecessor, you can use the
vertical scroll bar in the top pane to view the predecessor task. The
ID field remains selected while you scroll the task list. Do not select
the predecessor; just view its ID number. Type this number into the ID
field. You can then press Enter or click the green check button on the
Entry bar to complete the cell entry for the ID number.
Note The Type field accepts only
the two-letter abbreviations for the link types. If you have an
AutoCorrect entry for the link type you want to use, Project converts
it to the AutoCorrect text when you click OK—and it then rejects the
result because it accepts only the abbreviations. There is nothing to
do but click Cancel at this point, and then either delete the
AutoCorrect definition or edit the link elsewhere (for example, in the
Task Information dialog box). |
|
4. | Select
the predecessor’s Type field if you want to define a link type other
than Finish-to-Start. If you leave the Type field blank, Project
supplies the default Finish-to-Start type when you click the OK button.
Type in the two-letter code (FF, FS, SF, or SS) or use the drop-down
list to select the code. Press Enter to complete the cell entry in the
Type field.
|
5. | Select
the Lag field if you want to define a lag or lead time. The default, 0d
(zero days, meaning no lag or lead time), is supplied automatically
when you click the OK button if you leave this field blank. You can
move the spinner control up to display lags (positive values) or down
to display leads (negative values) in the default duration time units
or by using a percentage amount.
|
6. | If necessary, add more predecessors on the following rows in the Predecessors table by repeating steps 2–5.
|
7. | To delete a predecessor, click any cell in its row and press the Delete key.
|
8. | Click the OK button to execute the changes you entered in the Task Form view. |

